SpringBoot系列笔记-知识点全面总结
SpringBoot知识点全面总结
一、什么是SpringBoot?
Spring Boot是由Pivotal团队提供的一套开源框架,其设计目的是用来简化Spring应用的初始搭建以及开发过程。
也可以这么认为:Spring Boot是应用开发者和Spring本身框架的中间层技术框架。
二、为什么要用SpringBoot?
一句话概括: SpringBoot就是为了对Java web 的开发进行“简化”和“加快”速度,简化开发过程中引入或启动相关Spring 功能的配置。这样带来的好处就是降低开发人员对于框架的关注点,可以把更多的精力放在自己的业务代码上。
再展开说说:
- 提供了很多默认配置和很多组件化的依赖包,可以简化spring应用的创建及部署
- 提供了丰富的Spring模块化支持
- 支持快速整合第三方框架
- 支持完全注解化,简化xml配置
- 提供一系列大类项目常见的非功能特性支持(如嵌入式服务器、安全、度量、健康检查和外部化配置)。
因为使用简单,目前Spring Boot已经成为了JAVA应用开发领域的主流技术栈。尤其是目前微服务开发的流行,大家已经把SpringBoot当成JAVA微服务开发技术栈的首选项。
三、SpringBoot的迭代史
小郭花了2H,整理了SpringBoot的所有迭代版本和依赖组件的依赖关系表,方便日后查阅
整理不易,大家点个赞再走呀!
四、基础知识-程序目录结构
我们直接通过官网提供的项目生成工具,快速生成一个较完整的SpringBoot项目的目录结构。
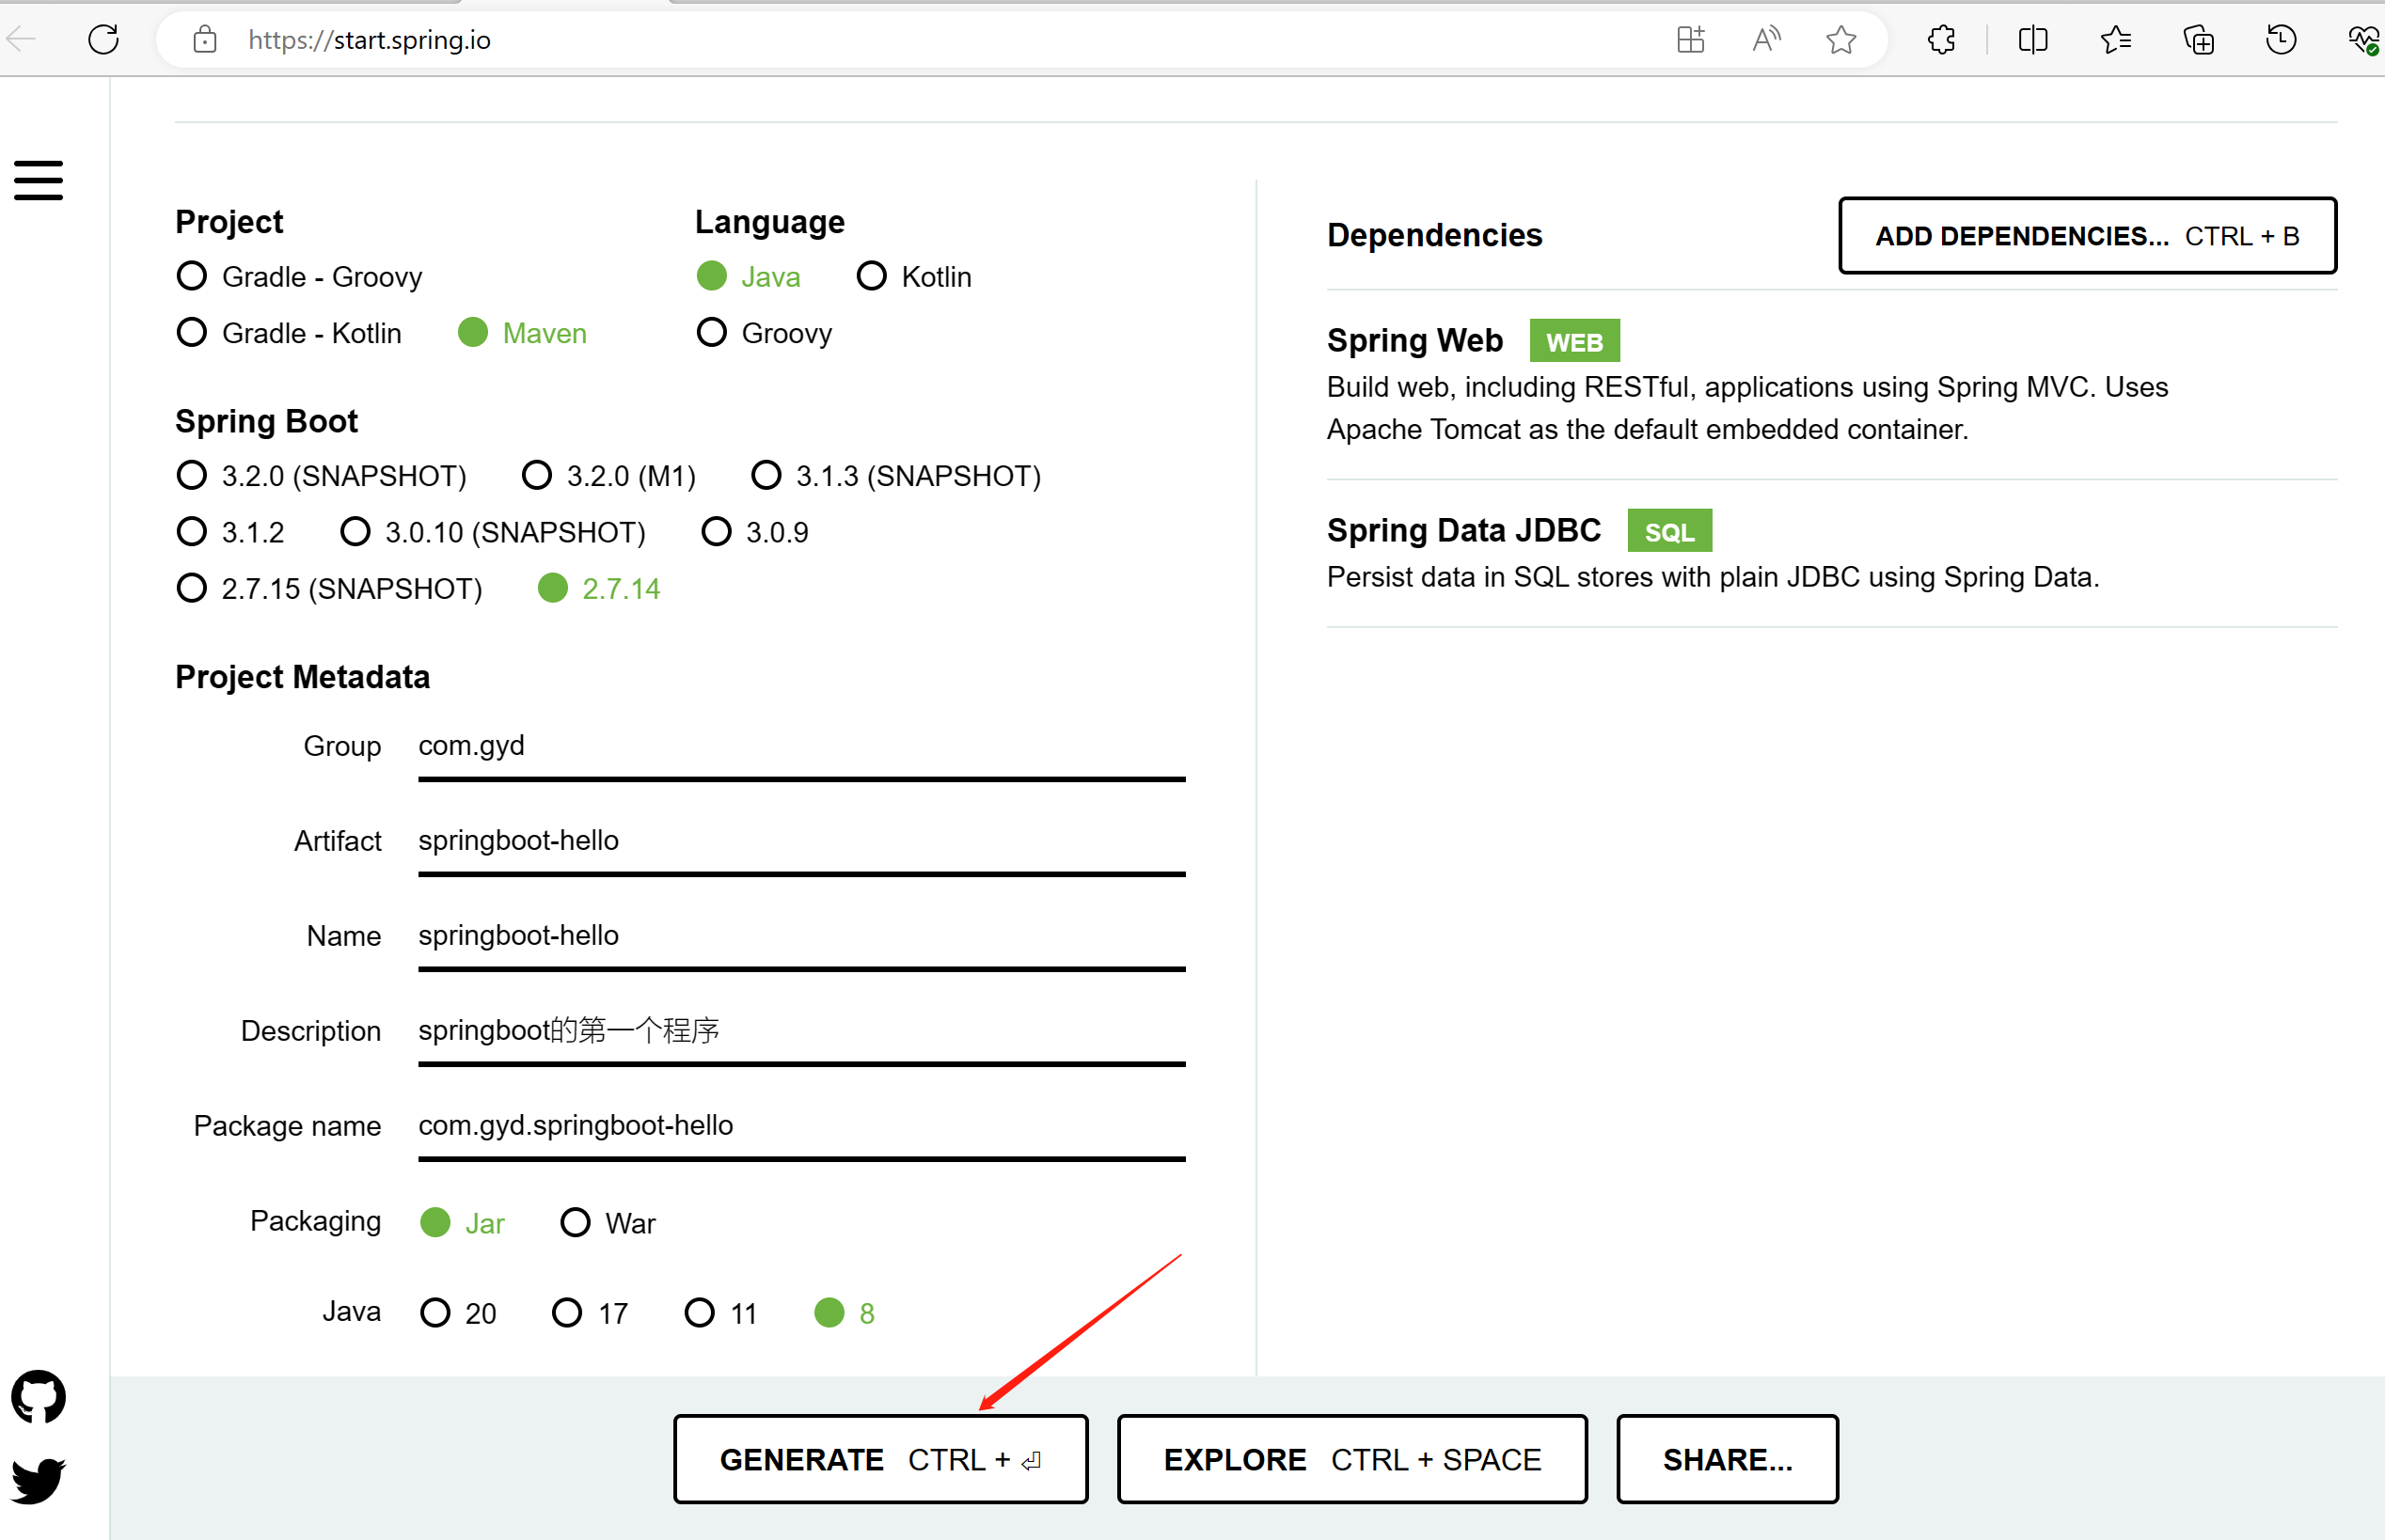
如上图所示,指定springboot/maven/java相关版本(按需),确认打包方式为jar格式,填写项目描述元数据,引入web和jdbc依赖(可选,按需),点击[GENERATE CTRL]生成目录。
将生成的项目解压,导入idea,目录结构展示如下:
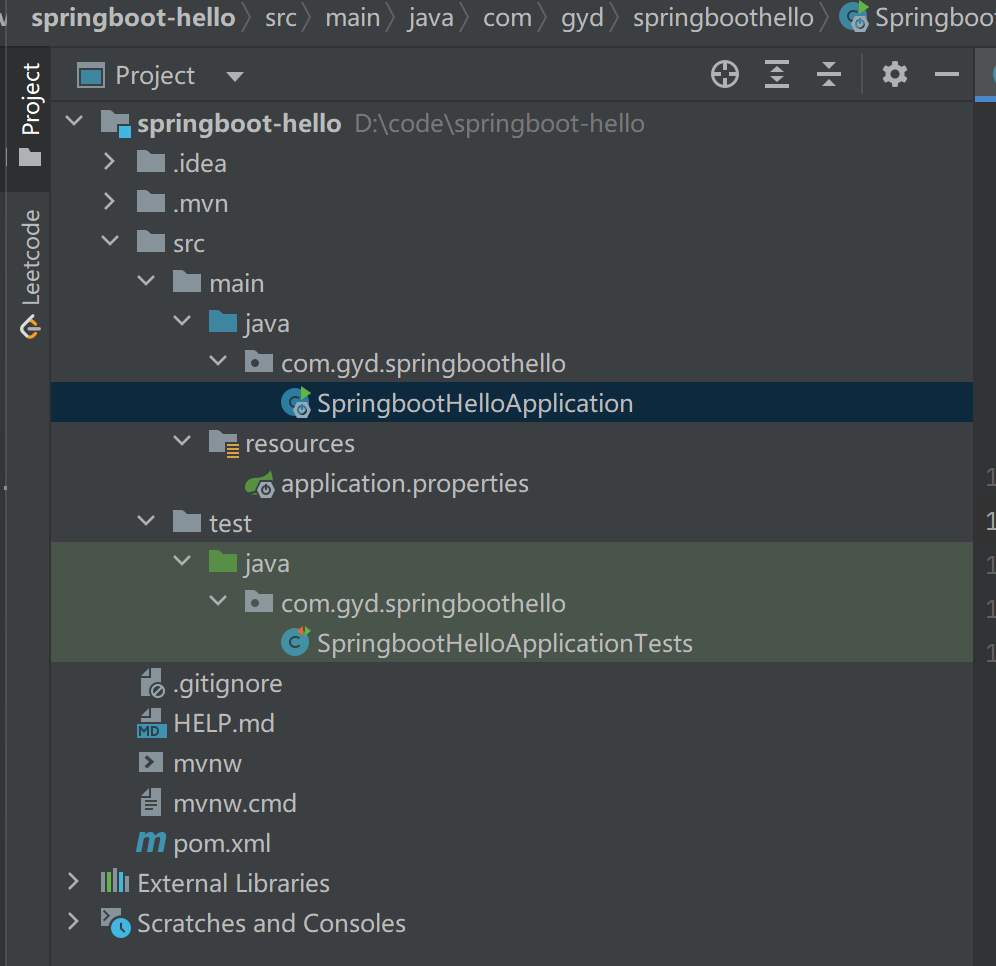
下面对每一个目录的用途进行说明:
springboot-hello    //项目名称
  -.idea  //idea自动生成的缓存文件
  -.mvn   //maven相关
  - src
    - main //存放代码源文件、配置文件
      -java  //存放代码源文件
       - com.gyd.springboothello
         -SpringbootHelloApplication
      -resource //存放配置文件如xml、properties格式的
       -application.properties
    - test  //编写单元测试用例和执行
    - .gitignore  //配置,指定提交git时要忽略哪些格式文件
    - HELP.md //springboot官方文档链接
    - mvnw  //maven相关
    - mvnw.cmd  //maven相关
    - pom.xml  // 项目基本信息定义、依赖组件引入
上面就是一个典型的springboot项目基础的结构了。
五、基础知识-自动配置原理
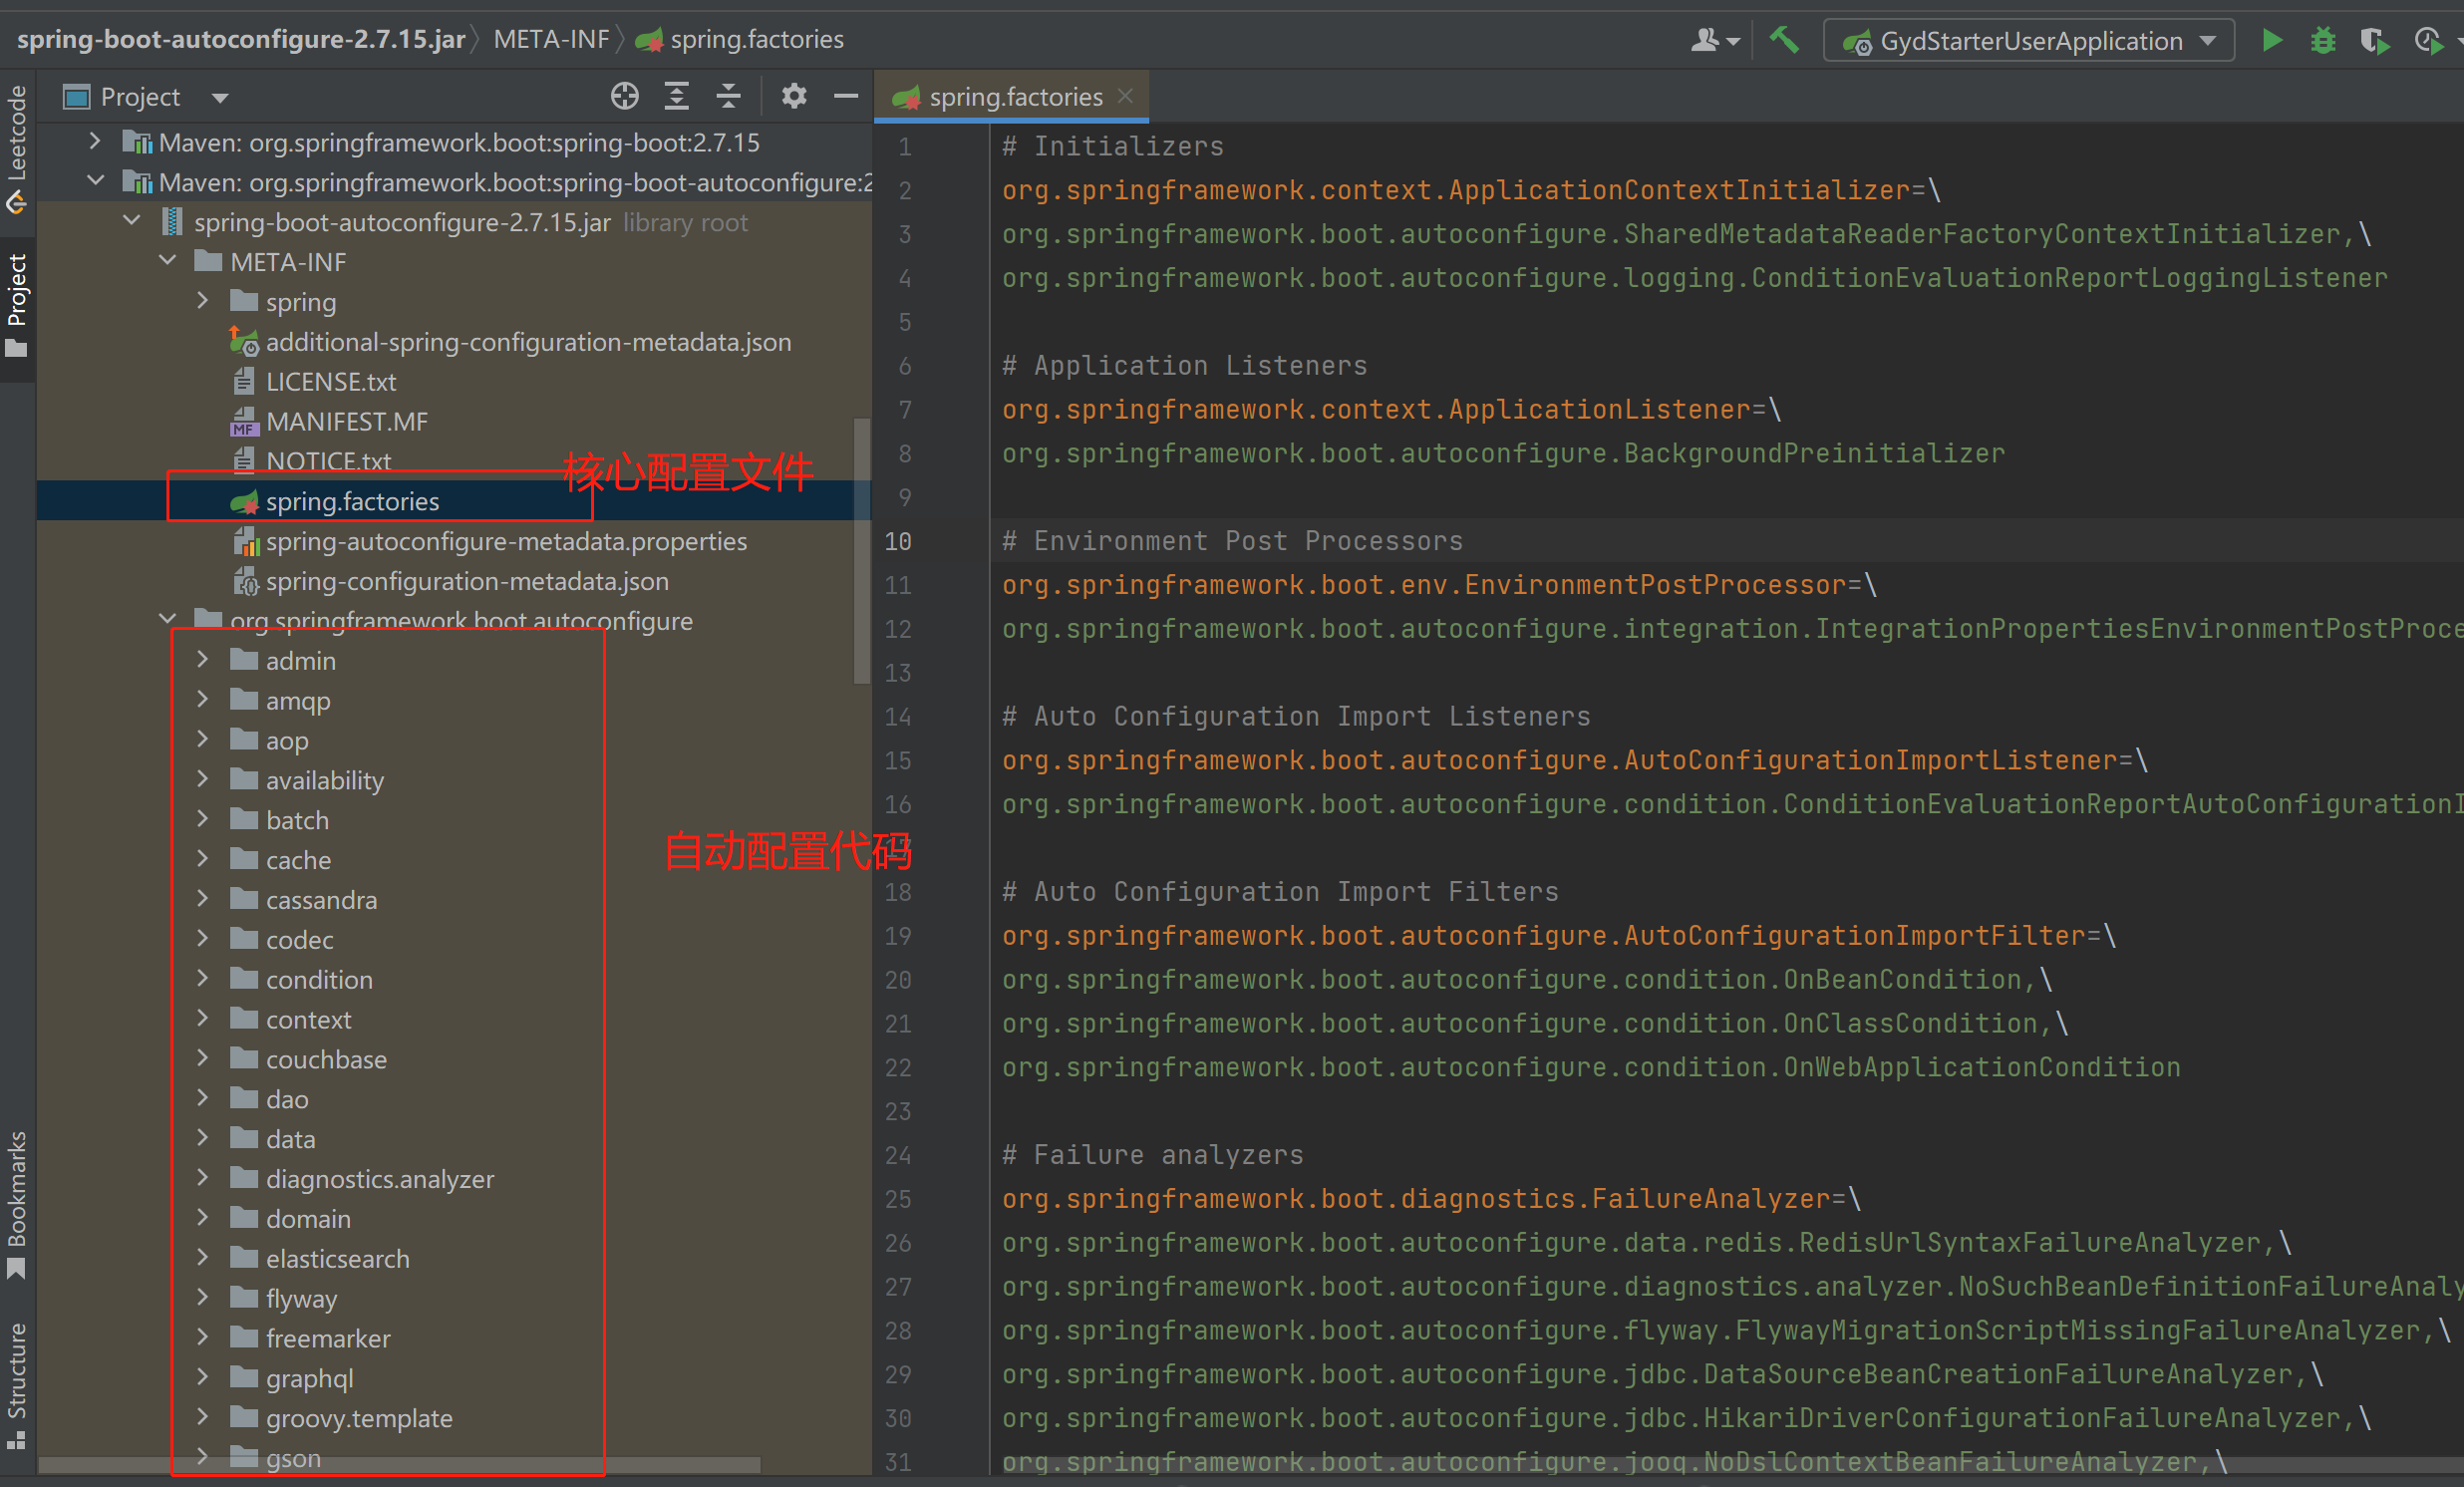
自动配置是SpringBoot的核心,而自动配置是基于条件判断来配置Bean的。关于自动配置的源码在spring-boot-autoconfigure-x.x.x.RELEASE.jar
这里我们从springboot的启动程序开始说起。
@SpringBootApplication
public class GydStarterUserApplication {

	public static void main(String[] args) {
		SpringApplication.run(GydStarterUserApplication.class, args);
	}

}
上述启动程序中使用了注解@SpringBootApplication。
@SpringBootApplication 标注在某个类上说明这个类是 SpringBoot 的主配置类,SpringBoot 通过运行这个类的 main 方法来启动 SpringBoot 应用。
我们来看看这个注解的定义:
@Target({ElementType.TYPE})
@Retention(RetentionPolicy.RUNTIME)
@Documented
@Inherited
@SpringBootConfiguration
@EnableAutoConfiguration
@ComponentScan(
    excludeFilters = {@Filter(
    type = FilterType.CUSTOM,
    classes = {TypeExcludeFilter.class}
), @Filter(
    type = FilterType.CUSTOM,
    classes = {AutoConfigurationExcludeFilter.class}
)}
)
public @interface SpringBootApplication {
	//略
}
从定义可以看出@SpringBootApplication是一个组合注解,主要组合了@Inherited、@SpringBootConfiguration、@ComponentScan、@EnableAutoConfiguration这几个注解。
下面我们针对每个注解展开了解一下。
1、@Inherited
@Inherited 元注解是一个标记注解,@Inherited阐述了某个被标注的类型是被继承的。 如果一个使用了@Inherited修饰的annotation类型被用于一个class,则这个annotation将被用于该class的子类。
@Inherited annotation类型是被标注过的class的子类所继承。类并不从它所实现的接口继承annotation,方法也并不从它所重载的方法继承annotation。
- 定义两个注解:@IsInheritedAnnotation 、@NoInherritedAnnotation,其中@IsInheritedAnnotation加了注解@Inherited
@Retention(RetentionPolicy.RUNTIME)
@Target(ElementType.TYPE)
@Inherited
public @interface IsInheritedAnnotation {
}

@Retention(RetentionPolicy.RUNTIME)
@Target(ElementType.TYPE)
public @interface NoInherritedAnnotation {
}- 测试类继承关系中@Inherited的作用
@NoInherritedAnnotation
@IsInheritedAnnotation
public class InheritedBase {
}

public class MyInheritedClass extends InheritedBase  {
}- 测试接口继承关系中@Inherited的作用
@NoInherritedAnnotation
@IsInheritedAnnotation
public interface IInheritedInterface {
}

public interface IInheritedInterfaceChild extends IInheritedInterface {
}- 测试类实现接口关系中@Inherited的作用
public class MyInheritedClassUseInterface implements IInheritedInterface {
}- 单元测试用例
package com.gyd.springboothello;

import com.gyd.springboothello.inherited.*;
import org.junit.jupiter.api.Test;
import org.springframework.boot.test.context.SpringBootTest;

import java.lang.annotation.Annotation;
import java.util.Arrays;

import static org.springframework.test.util.AssertionErrors.assertTrue;

@SpringBootTest
class SpringbootHelloApplicationTests {

	@Test
	void testInherited() {
		{
			//类继承关系中,子类会继承父类使用的注解中被@Inherited修饰的注解
			Annotation[] annotations = MyInheritedClass.class.getAnnotations();
			assertTrue("", Arrays.stream(annotations).anyMatch(l -> l.annotationType().equals(IsInheritedAnnotation.class)));
			assertTrue("", Arrays.stream(annotations).noneMatch(l -> l.annotationType().equals(NoInherritedAnnotation.class)));
		}
		{
			//类实现接口时不会继承任何接口中定义的注解
			Annotation[] annotations = MyInheritedClassUseInterface.class.getAnnotations();
			assertTrue("", Arrays.stream(annotations).noneMatch(l -> l.annotationType().equals(IsInheritedAnnotation.class)));
			assertTrue("", Arrays.stream(annotations).noneMatch(l -> l.annotationType().equals(NoInherritedAnnotation.class)));
		}
		{
			//接口定义注解时,可以通过接口获取注解信息
			Annotation[] annotations = IInheritedInterface.class.getAnnotations();
			assertTrue("", Arrays.stream(annotations).anyMatch(l -> l.annotationType().equals(IsInheritedAnnotation.class)));
			assertTrue("", Arrays.stream(annotations).anyMatch(l -> l.annotationType().equals(NoInherritedAnnotation.class)));
		}
		{
			//接口继承关系中,子接口不会继承父接口中的任何注解,不管父接口中使用的注解有没有被@Inherited修饰
			Annotation[] annotations = IInheritedInterfaceChild.class.getAnnotations();
			assertTrue("", Arrays.stream(annotations).noneMatch(l -> l.annotationType().equals(IsInheritedAnnotation.class)));
			assertTrue("", Arrays.stream(annotations).noneMatch(l -> l.annotationType().equals(NoInherritedAnnotation.class)));
		}
	}

}
上述单元测试用例执行通过,证明了以下结论:
1)类继承关系中@Inherited的作用
类继承关系中,子类会继承父类使用的注解中被@Inherited修饰的注解
2)接口继承关系中@Inherited的作用
接口继承关系中,子接口不会继承父接口中的任何注解,不管父接口中使用的注解有没有被@Inherited修饰
3)类实现接口关系中@Inherited的作用
类实现接口时不会继承任何接口中定义的注解
2、@SpringBootConfiguration
@SpringBootConfiguration 里面是@Configuration,标记当前类是配置类,源码如下:
@Target({ElementType.TYPE})
@Retention(RetentionPolicy.RUNTIME)
@Documented
@Configuration
public @interface SpringBootConfiguration {
    @AliasFor(
        annotation = Configuration.class
    )
    boolean proxyBeanMethods() default true;
}
从源码可以看出,@SpringBootConfiguration 标注这个类是一个配置类。
@SpringBootConfiguration只是@Configuration注解的派生注解,与@Configuration注解的功能一致。
@Configuration 可以理解为一个Configuration就是对应的一个Spring的xml版的容器。
3、@ComponentScan
@ComponentScan注解用于实现spring的注解扫描,会扫描特定包内的类上的注解。
@Retention(RetentionPolicy.RUNTIME)
@Target({ElementType.TYPE})
@Documented
@Repeatable(ComponentScans.class)
public @interface ComponentScan {
    @AliasFor("basePackages")
	//与basePackages属性互为别名,作用一样
	//该属性配置的是spring要扫描的基础包,定义了之后,spring默认会扫描该包及其子包下的相应注解生成bean组件。
	//该属性是一个数组,也就是可以定义多个基础包。
	//当该属性不设置的时候,默认扫描该配置类所在的包及其子包下的组件。
    String[] value() default {};

    @AliasFor("value")
	//扫描的基础包路径
    String[] basePackages() default {};
	//配置要扫描的类的class对象,默认会扫描该类所在的包及其子包下的组件
    Class<?>[] basePackageClasses() default {};

	//bean id 生成器,定义了一套生成bean id 的规则
	//配置bean Id的生成规则,默认是如果组件注解@Component、@Controller、@Service、@Repository、@Named、ManagedBean注解都没有显示配置组件id时,
	//就会把类名第一位转化为小写作为该组件的id。
	//如果不同包中有相同名字的类,在扫描时就会报错
    Class<? extends BeanNameGenerator> nameGenerator() default BeanNameGenerator.class;

    Class<? extends ScopeMetadataResolver> scopeResolver() default AnnotationScopeMetadataResolver.class;

    ScopedProxyMode scopedProxy() default ScopedProxyMode.DEFAULT;

	//定义扫描的规则
	//该属性设置在基础包的前提下,扫描的路径**表示任意层级,所以默认是从基础包开始任意层级的class文件。
    //如果修改成*/*.class 就不会扫描子包,只会扫描当前包的class文件。
    //如果修改**/Serivce.class 只会扫描当前包下的Serivce.class结尾的文件。

    String resourcePattern() default "**/*.class";
	//是否使用默认的过滤器,默认true
	//默认过滤器是指被@Component注解 注解的注解,比如Controller、Service、Repository、Component。
	//也有其他的@Named等。默认是true,开启。也就是我们可以自定义组件注解,只要用@Component注解在自定义注解上面,spring默认会扫描到
    boolean useDefaultFilters() default true;
	//指定包含哪些过滤器
    Filter[] includeFilters() default {};
	//指定排除哪些过滤器
    Filter[] excludeFilters() default {};
	//是否延迟加载,默认false,也就是默认是bean是立即加载到容器中
    boolean lazyInit() default false;

    @Retention(RetentionPolicy.RUNTIME)
    @Target({})
	//内部注解,是定义扫描规则的注解
    public @interface Filter {
        FilterType type() default FilterType.ANNOTATION;

        @AliasFor("classes")
        Class<?>[] value() default {};

        @AliasFor("value")
        Class<?>[] classes() default {};

        String[] pattern() default {};
    }
}
4、@EnableAutoConfiguration
终于讲到了SpringBoot自动配置的核心注解!
@Target({ElementType.TYPE})
@Retention(RetentionPolicy.RUNTIME)
@Documented
@Inherited
@AutoConfigurationPackage
@Import({AutoConfigurationImportSelector.class})
public @interface EnableAutoConfiguration {
    String ENABLED_OVERRIDE_PROPERTY = "spring.boot.enableautoconfiguration";

    Class<?>[] exclude() default {};

    String[] excludeName() default {};
}
@EnableAutoConfiguration也是一个组合注解,其中最关键的组合注解属性是@Import。
@Import注解借助AutoConfigurationImportSelector,使得@EnableAutoConfiguration 可以帮助SpringBoot应用将所有符合条件的@Configuration配置都加载到当前SpringBoot创建并使用的IOC容器。通过@Import(AutoConfigurationImportSelector.class)导入的配置功能,AutoConfigurationImportSelector 中的方法 getCandidateConfigurations,得到待配置的class的类名集合,这个集合就是所有需要进行自动配置的类,而是否配置的关键在于META-INF/spring.factories 文件中是否存在该配置信息
AutoConfigurationImportSelector类中核心方法getCandidateConfigurations的源码:
protected List<String> getCandidateConfigurations(AnnotationMetadata metadata, AnnotationAttributes attributes) {
	List<String> configurations = new ArrayList(SpringFactoriesLoader.loadFactoryNames(this.getSpringFactoriesLoaderFactoryClass(), this.getBeanClassLoader()));
	ImportCandidates.load(AutoConfiguration.class, this.getBeanClassLoader()).forEach(configurations::add);
	Assert.notEmpty(configurations, "No auto configuration classes found in META-INF/spring.factories nor in META-INF/spring/org.springframework.boot.autoconfigure.AutoConfiguration.imports. If you are using a custom packaging, make sure that file is correct.");
	return configurations;
}
getCandidateConfigurations调用了SpringFactoriesLoader.loadFactoryNames,该方法源码如下:
public static List<String> loadFactoryNames(Class<?> factoryType, @Nullable ClassLoader classLoader) {
	ClassLoader classLoaderToUse = classLoader;
	if (classLoader == null) {
		classLoaderToUse = SpringFactoriesLoader.class.getClassLoader();
	}

	String factoryTypeName = factoryType.getName();
	return (List)loadSpringFactories(classLoaderToUse).getOrDefault(factoryTypeName, Collections.emptyList());
}
SpringFactoriesLoader.loadFactoryNames方法又调用了loadSpringFactories:
private static Map<String, List<String>> loadSpringFactories(ClassLoader classLoader) {
	Map<String, List<String>> result = (Map)cache.get(classLoader);
	if (result != null) {
		return result;
	} else {
		Map<String, List<String>> result = new HashMap();

		try {
			Enumeration<URL> urls = classLoader.getResources("META-INF/spring.factories");
			//代码略...
			//....
			cache.put(classLoader, result);
			return result;
		} catch (IOException var14) {
			throw new IllegalArgumentException("Unable to load factories from location [META-INF/spring.factories]", var14);
		}
	}
}
可以看到源码里写死了META-INF/spring.factories这个路径,这就是我们在使用spring自动配置功能时,为什么需要在这个路径下声明自己的配置类的原因了!比如接下来要说到的自定义Starter就用到了这个配置文件呢。
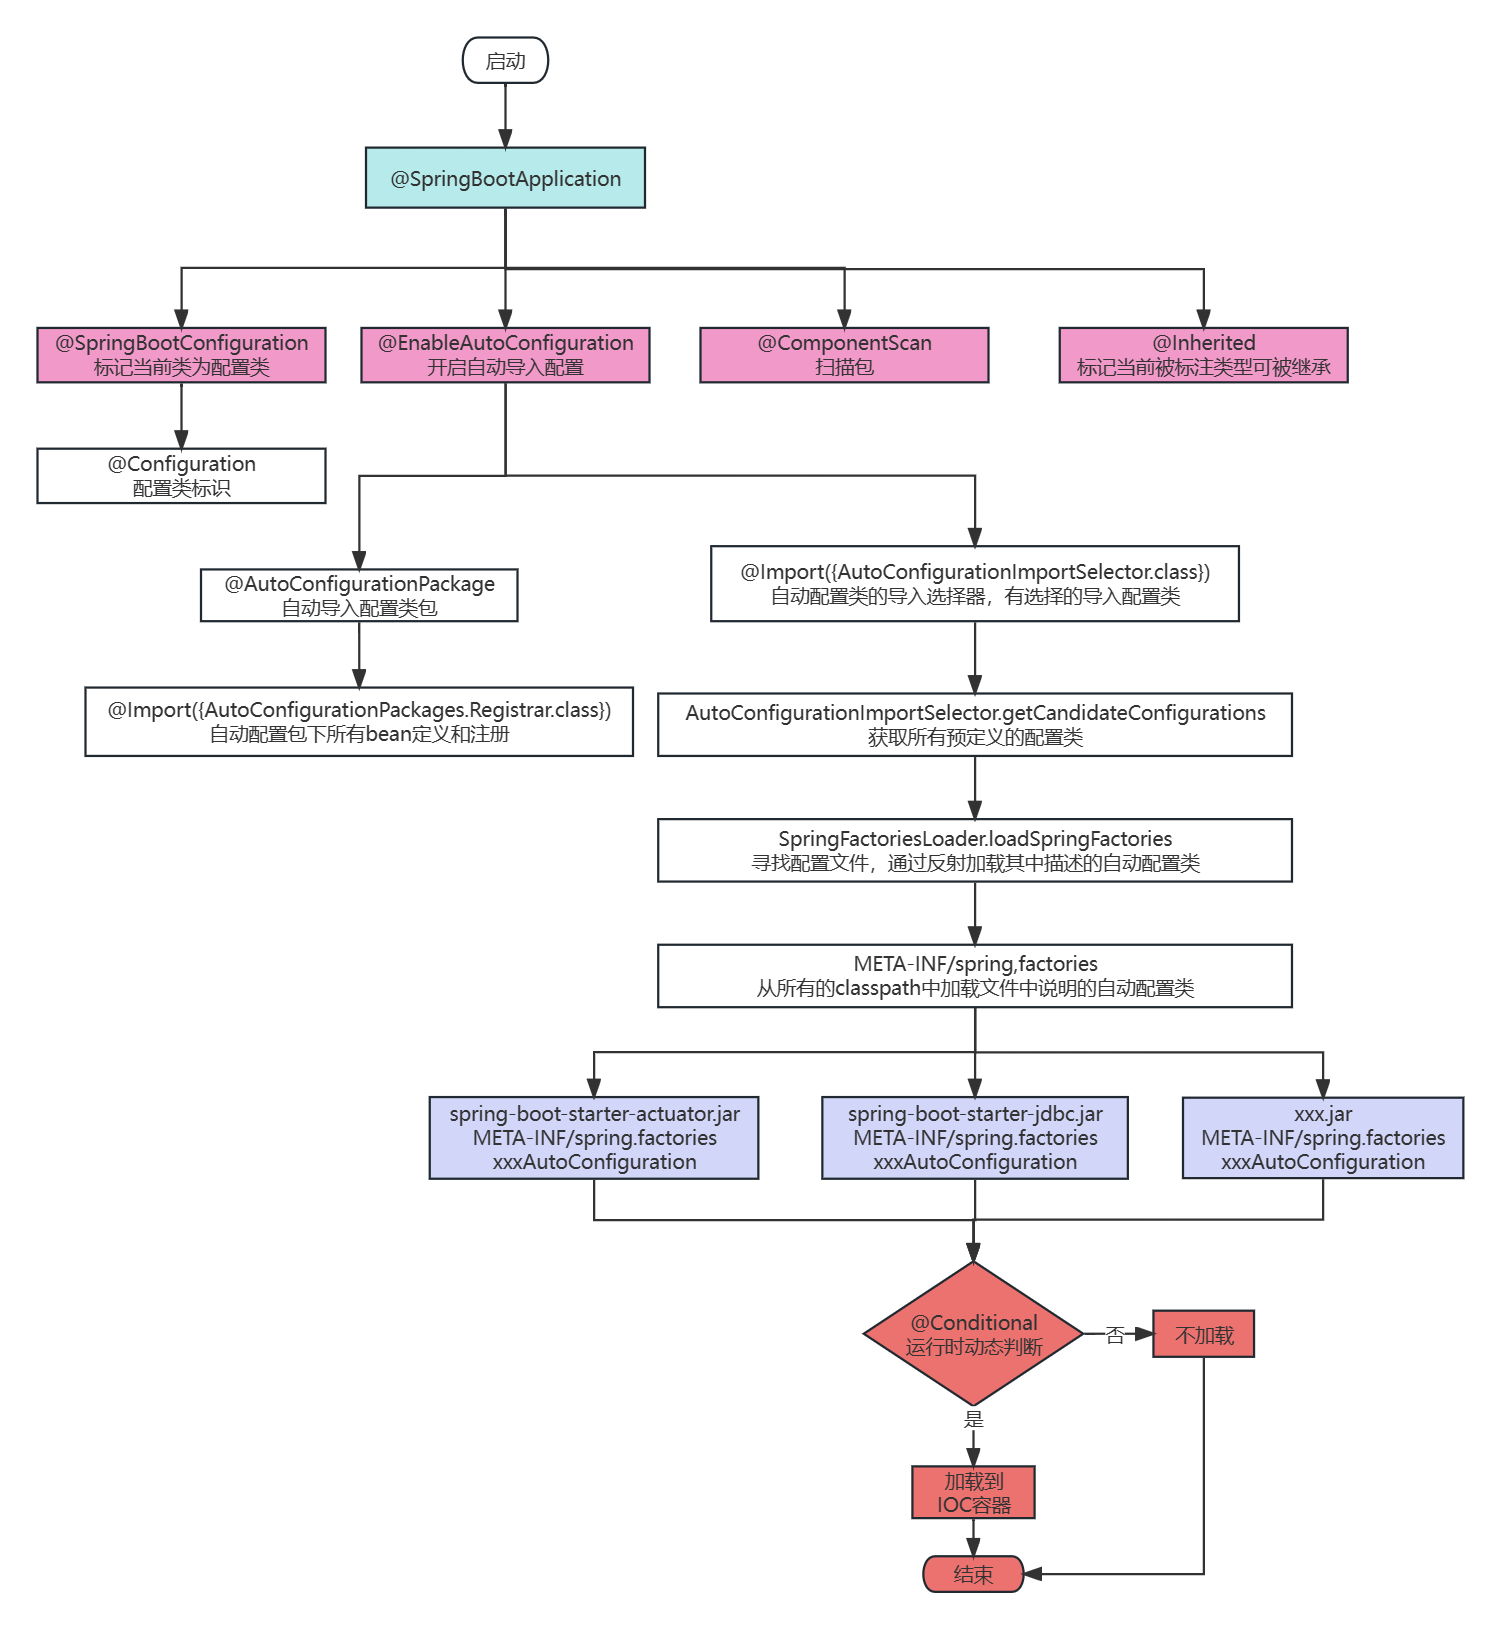
最后总结一下SpringBoot自动配置原理:
六、基础知识-自定义starter
本节的相关知识来源于对starter概述 的总结学习
1、Starter概述
Starter是一系列开箱即用的依赖,通过直接引入Starter,我们可以一次性获得某个技术组件需要的全部依赖,免去了需要到处大量复制粘贴依赖的烦恼。
SpringBoot给我们提供了许多有用的Starter,这也是使用SpringBoot作为开发框架的好处之一。
例如,如果一个springboot项目要整合JPA进行数据库访问,那么可以直接在项目的pom文件中声明 spring-boot-starter-data-jpa 依赖:
<dependency>
  <groupId>org.springframework.boot</groupId>
  <artifactId>spring-boot-starter-data-jpa</artifactId>
  <version>2.7.14</version>
</dependency>
再来看看spring-boot-starter-data-jpa的pom依赖声明,会发现其内部定义了许多和数据库操作相关的依赖如jdbc、hibernate等,我们不需要关心底层的具体的依赖,只需要引入管理他们的Starter即可。
<dependencies>
  <dependency>
    <groupId>org.springframework.boot</groupId>
    <artifactId>spring-boot-starter-aop</artifactId>
    <version>2.7.14</version>
    <scope>compile</scope>
  </dependency>
  <dependency>
    <groupId>org.springframework.boot</groupId>
    <artifactId>spring-boot-starter-jdbc</artifactId>
    <version>2.7.14</version>
    <scope>compile</scope>
  </dependency>
  <dependency>
    <groupId>jakarta.transaction</groupId>
    <artifactId>jakarta.transaction-api</artifactId>
    <version>1.3.3</version>
    <scope>compile</scope>
  </dependency>
  <dependency>
    <groupId>jakarta.persistence</groupId>
    <artifactId>jakarta.persistence-api</artifactId>
    <version>2.2.3</version>
    <scope>compile</scope>
  </dependency>
  <dependency>
    <groupId>org.hibernate</groupId>
    <artifactId>hibernate-core</artifactId>
    <version>5.6.15.Final</version>
    <scope>compile</scope>
    <exclusions>
      <exclusion>
        <artifactId>jaxb-api</artifactId>
        <groupId>javax.xml.bind</groupId>
      </exclusion>
      <exclusion>
        <artifactId>javax.activation-api</artifactId>
        <groupId>javax.activation</groupId>
      </exclusion>
      <exclusion>
        <artifactId>javax.persistence-api</artifactId>
        <groupId>javax.persistence</groupId>
      </exclusion>
      <exclusion>
        <artifactId>jboss-transaction-api_1.2_spec</artifactId>
        <groupId>org.jboss.spec.javax.transaction</groupId>
      </exclusion>
    </exclusions>
  </dependency>
  <dependency>
    <groupId>org.springframework.data</groupId>
    <artifactId>spring-data-jpa</artifactId>
    <version>2.7.14</version>
    <scope>compile</scope>
  </dependency>
  <dependency>
    <groupId>org.springframework</groupId>
    <artifactId>spring-aspects</artifactId>
    <version>5.3.29</version>
    <scope>compile</scope>
  </dependency>
</dependencies>
2、Starter的命名规范
所有官方的Starter都遵循一个统一的命名模式;spring-boot-starter-*,其中 * 是一个通配符,代表一个特定类型的应用程序,例如spring-boot-starter-activemq是对消息中间件activemq的依赖封装,spring-boot-starter-quartz是对定时任务组件quartz的依赖封装。
我们自定义Starter时,应该避免使用spring-boot-开头来命名,建议使用项目标识命名。例如我的项目gydblog,如果要自定义Starter,建议命名为gydblog-starter-*。
3、官方提供的Starter
数据截止20230825
下面列出springboot在 org.springframework.boot 这个 groupId 下提供的starter组件,摘抄于官网:
| 名称 | 描述 |
|---|---|
SpringBoot提供的一个核心启动器,包括自动配置支持、日志记录和YAML | |
消息中间件Apache ActiveMQ(基于JMS) | |
消息中间件Spring AMQP和Rabbit MQ | |
Spring AOP和AspectJ面向切面编程 | |
消息中间件Apache ActiveMQ(基于JMS) | |
使用Spring Batch支持批处理 | |
使用Spring框架的缓存能力 | |
引入分布式数据库管理cassandra | |
引入分布式数据库管理cassandra | |
Starter for using Couchbase document-oriented database and Spring Data Couchbase | |
支持非关系型数据库couchbase | |
支持使用Elasticsearch搜索技术 | |
引入spring-data-jdbc连接数据库 | |
引入ORM框架spring data jpa | |
引入LDAP(轻量级目录访问协议实现) | |
支持文档数据库mongodb操作 | |
持文档数据库mongodb操作 | |
提供了使用Neo4j图形数据库的支持 | |
提供了使用Spring Data R2DBC数据库的支持 | |
提供了使用 Redis 数据库的支持 | |
提供了使用 Redis 数据库的支持(SpringBoot 2.2及以上) | |
Spring Data REST支持,用于简化 RESTful API 的开发 | |
提供对freemarker模板的渲染支持 | |
提供了 GraphQL 的支持 | |
提供了对groovy模板引擎的支持 | |
支持基于HATEOAS的RESTful Web服务 | |
它用于Spring集成 | |
用于HikariCP JDBC连接池的JDBC | |
它用于使用JAX-RS和Jersey构建RESTful Web应用程序。替代spring-boot-starter-web | |
用于jOOQ访问SQL数据库。替代spring-boot-starter-data-jpa或spring-boot-starter-jdbc。 | |
提供了对JSON序列化和反序列化的支持 | |
用于支持Java Mail和Spring Framework的电子邮件发送 | |
spring-boot-starter-mustache | |
支持快速搭建和配置一个安全的OAuth 2.0授权服务器 | |
支持快速集成OAuth2客户端功能 | |
支持创建 OAuth2 资源服务器,快速实现授权和身份验证功能 | |
支持快速集成Quartz调度框架 | |
提供使用RSocket进行消息传递的客户端和服务端支持 | |
提供了集成安全框架Spring Security的功能 | |
提供测试支持,支持使用JUnit Jupiter、Hamcrest和Mockito等库测试Spring Boot应用程序 | |
用于使用Thymeleaf视图构建MVC Web应用程序。 | |
通过Hibernate Validator进行Java Bean验证。 | |
用于构建Web应用程序,包括使用Spring MVC的RESTful应用程序。它使用Tomcat作为默认的嵌入式容器。 | |
快速集成Spring WebService功能 | |
Starter for building WebFlux applications using Spring Framework’s Reactive Web support | |
使用Spring Framework的MVC WebSocket支持构建WebSocket应用程序 |
4、自定义Starter
在我们的日常开发工作中,经常会有一些独立于业务之外的配置模块,我们经常将其放到一个特定的包下,然后如果另一个工程需要复用这块功能的时候,需要将代码硬拷贝到另一个工程,重新集成一遍,非常麻烦,而且容易出错。 如果我们将这些可独立于业务代码之外的功能配置模块封装成一个个starter,复用的时候只需要将其在pom中引用依赖即可,由SpringBoot为我们完成自动装配,非常方便,也实现了代码的统一控制。
自定义Starter的目录结构如下:
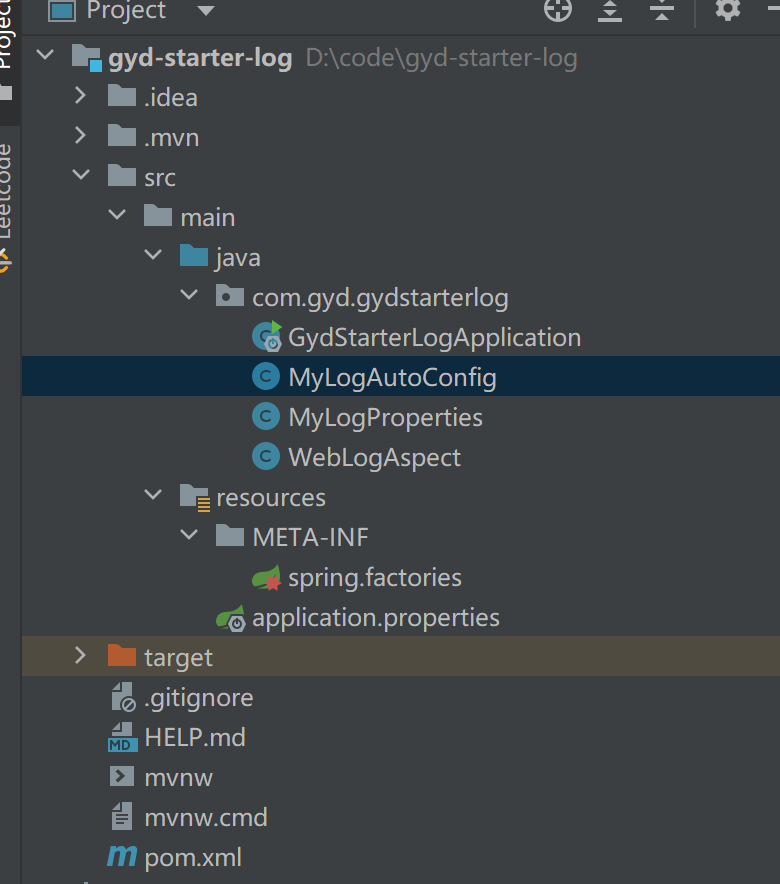
下面演示自定义上面图中的Starter的步骤。
使用AOP实现拦截方法执行和打印日志的功能
1)创建Starter项目(gyd-starter-log 0.0.1) 新建一个项目gyd-starter-log,版本号是0.0.1,同时必须引入下面的依赖:
2)添加POM依赖
<!--表示两个项目之间依赖不传递;不设置optional或者optional是false,表示传递依赖-->
<!--例如:project1依赖a.jar(optional=true),project2依赖project1,则project2不依赖a.jar-->
<dependency>
	<groupId>org.springframework.boot</groupId>
	<artifactId>spring-boot-configuration-processor</artifactId>
	<optional>true</optional>
 </dependency>
<dependency>
	<groupId>org.springframework.boot</groupId>
	<artifactId>spring-boot-starter-aop</artifactId>
</dependency>
3)定义Starter需要的配置类(Properties)
package com.gyd.gydstarterlog;

import org.springframework.boot.context.properties.ConfigurationProperties;

@ConfigurationProperties(prefix = "gyd.log")
public class MyLogProperties {
    private boolean enabled;

    public boolean isEnabled() {
        return enabled;
    }

    public void setEnabled(boolean enabled) {
        this.enabled = enabled;
    }
}
如果我们需要从 application.yaml 或 application.properties 中拿到一些使用者配置的数据,那么我们就需要定义一个properties类。这个properties类主要作用是将 application.yaml 或 application.properties 中的配置信息映射成实体类,比如我们这里指定 prefix = "gyd.log" 这样,我们就能将以gyd.log为前缀的配置项拿到了。
4)编写Starter项目的业务功能
AOP切面逻辑
package com.gyd.gydstarterlog;

import org.aspectj.lang.JoinPoint;
import org.aspectj.lang.annotation.AfterReturning;
import org.aspectj.lang.annotation.Aspect;
import org.aspectj.lang.annotation.Before;
import org.aspectj.lang.annotation.Pointcut;
import org.springframework.stereotype.Component;

@Aspect
@Component
public class WebLogAspect {
    @Pointcut("execution(* *..*Controller.*(..))")
    public void webLog(){}

    @Before("webLog()")
    public void doBefore(JoinPoint joinPoint) throws Throwable {
		//方法开始前,打印开始日志
        System.out.println("gyd-starter --------doBefore");
    }

    @AfterReturning(returning = "ret", pointcut = "webLog()")
    public void doAfterReturning(Object ret) throws Throwable {
        // 处理完请求,打印结束日志
        System.out.println("gyd-starter --------doAfterReturning");
    }
}
5)编写自动配置类
package com.gyd.gydstarterlog;


import org.springframework.boot.autoconfigure.condition.ConditionalOnMissingBean;
import org.springframework.boot.autoconfigure.condition.ConditionalOnProperty;
import org.springframework.boot.context.properties.EnableConfigurationProperties;
import org.springframework.context.annotation.Bean;
import org.springframework.context.annotation.Configuration;

@Configuration
@EnableConfigurationProperties({MyLogProperties.class})
@ConditionalOnProperty(prefix = "gyd.log",
        value = "enabled")
public class MyLogAutoConfig {
    @Bean
    @ConditionalOnMissingBean
    public WebLogAspect webLogAspect(){
        return new WebLogAspect();
    }
}
MyLogAutoConfig 使用了以下 5 个注解:
@Configuration:表示该类是一个配置类;
@EnableConfigurationProperties(xxxProperties.class):该注解的作用是为 xxxProperties 开启属性配置功能,并将这个类以组件的形式注入到容器中;
@ConditionalOnProperty(prefix = "xxx", name= "x", matchIfMissing = true) : 当指定的配置项等于你想要的时候,配置类生效;
@ConditionalOnMissingBean(xxx.class):该注解表示当容器中没有 xxx 类时,该方法才生效;
@Bean:该注解用于将方法的返回值以 Bean 对象的形式添加到容器中。
6)编写spring.factories文件加载自动配置类
org.springframework.boot.autoconfigure.EnableAutoConfiguration=\
com.gyd.gydstarterlog.MyLogAutoConfig
7)构建starter制品包 配置打包组件:
<plugins>
	<plugin>
		<groupId>org.springframework.boot</groupId>
		<artifactId>spring-boot-maven-plugin</artifactId>
		<configuration>
			<classifier>exec</classifier>
		</configuration>
	</plugin>
</plugins>
在项目根目录下执行mvn clean install,打包并放到maven仓库中(maven仓库地址和配置有关)
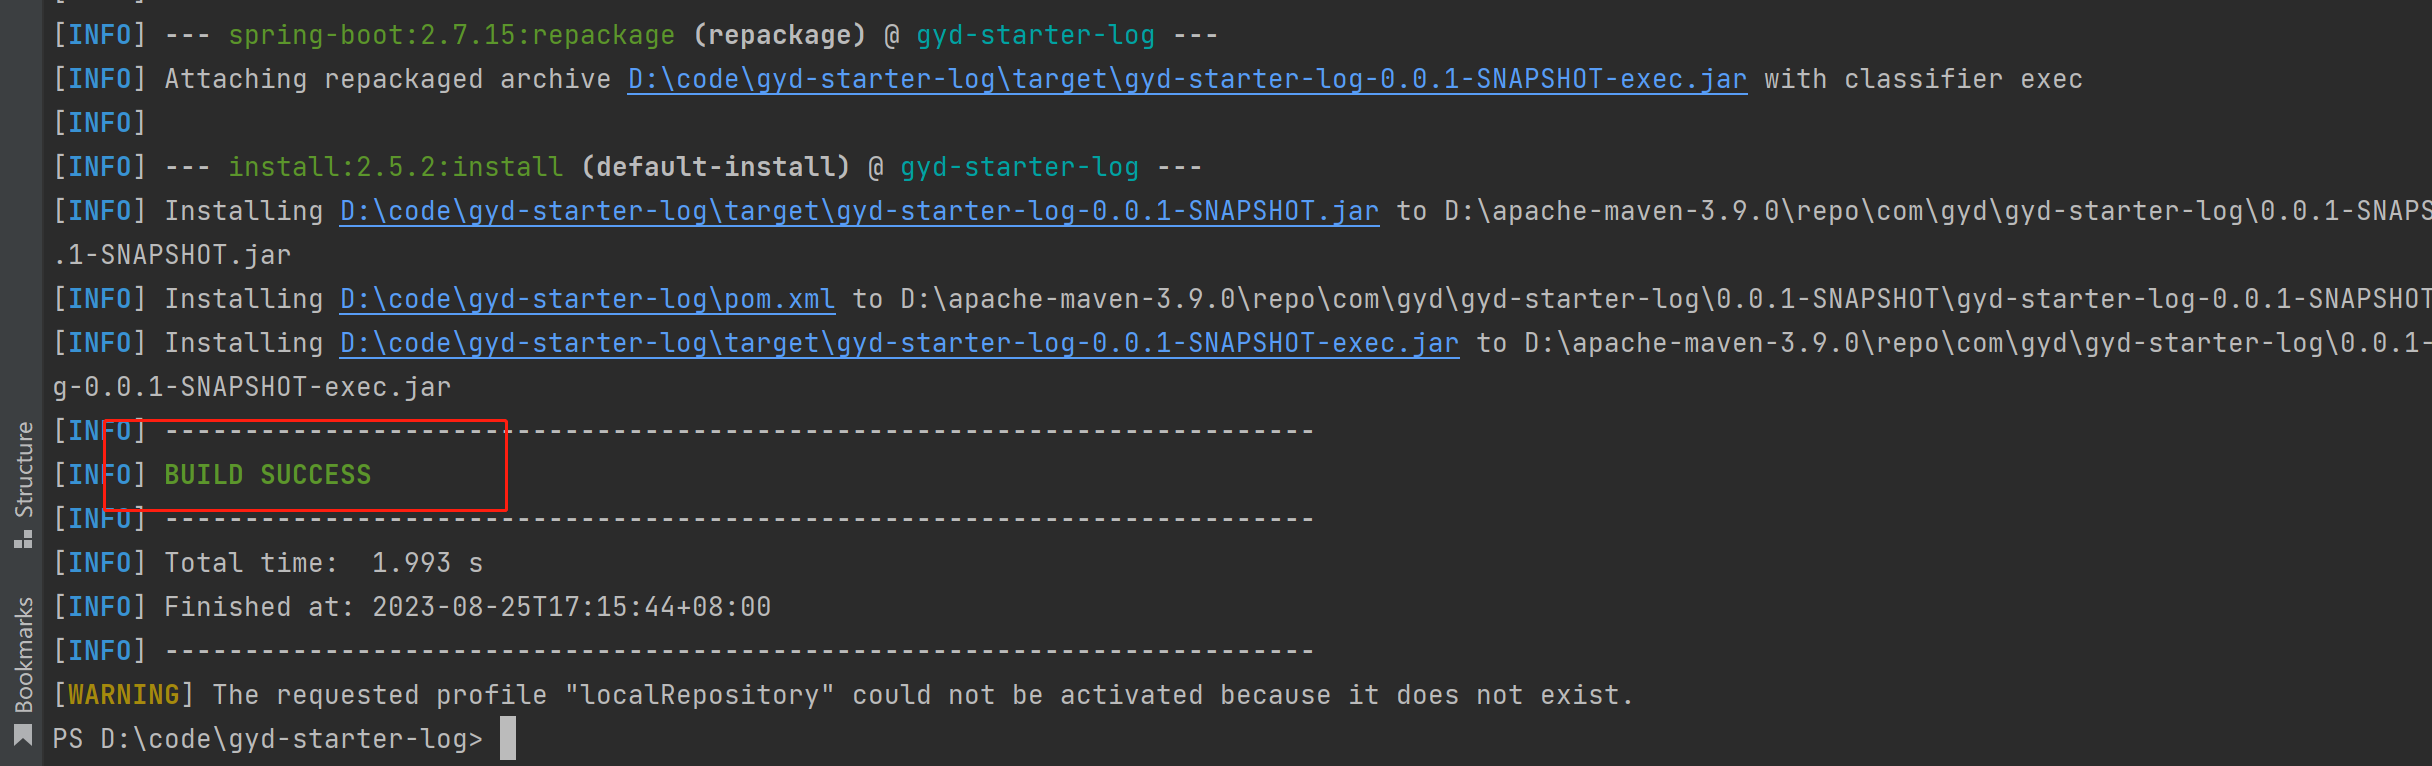
显示build success,表示starter制品包打包完成
8)其它项目引用验证

- a. pom中引入自定义starter依赖
<!--引入自定义Starter-->
<dependency>
	<groupId>com.gyd</groupId>
	<artifactId>gyd-starter-log</artifactId>
	<version>0.0.1-SNAPSHOT</version>
</dependency>

<!--web服务支持-->
<dependency>
	<groupId>org.springframework.boot</groupId>
	<artifactId>spring-boot-starter-web</artifactId>
</dependency>- b. 写一个Controller接口(要符合starter里的aop拦截表达式规则,否则拦截不到)
package com.gyd.gydstarteruser;
import org.springframework.web.bind.annotation.GetMapping;
import org.springframework.web.bind.annotation.RestController;
@RestController
public class HelloController {
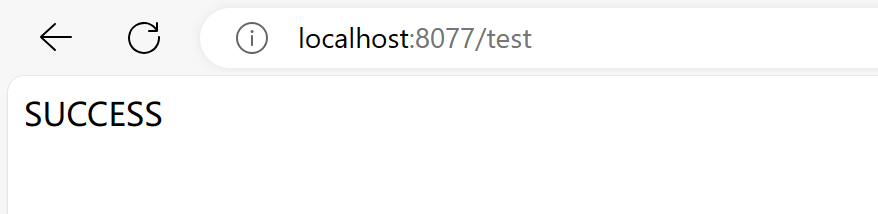
@GetMapping("/test")
public String test(){
return "SUCCESS";
}
}- c. 配置文件 application.properties中:
gyd.log.enabled=true
server.port=8077- d. 启动业务项目,访问接口,验证

至此,一个简单的starter示例就写完了。
七、基础知识-整合外部框架
1、整合Spring MVC
SpringBoot 对 SpringMVC 的一些自动配置可以满足大部分需求,但也可以自定义配置类 并实现WebMvcConfigurer接口 进行配置
| 方法 | 说明 |
|---|---|
| addInterceptors(InterceptorRegistry registry) | 添加 Spring MVC 生命周期拦截器,对请求进行拦截处理 |
| addResourceHandlers(ResourceHandlerRegistry registry) | 添加 或 修改静态资源 SpringBoot 默认设置的静态资源文件夹就是通过重写该方法设置的 |
| addViewControllers(ViewControllerRegistry registry) | 主要用于实现 无业务逻辑跳转,例如 主页跳转,重定向 |
1)增加依赖 编辑pom.xml文件,添加Spring web依赖,Thymeleaf依赖
Web依赖: 提供了Spring MVC核心API,同时会嵌入一个Tomcat服务器 Thymeleaf依赖:提供了一个视图解析器对象以及数据绑定机制
<!-- 添加Spring web依赖 -->
<dependency>
    <groupId>org.springframework.boot</groupId>
    <artifactId>spring-boot-starter-web</artifactId>
</dependency>

<!-- 添加Thymeleaf依赖 -->
<dependency>
    <groupId>org.springframework.boot</groupId>
    <artifactId>spring-boot-starter-thymeleaf</artifactId>
</dependency>
2)在application.properties中添加视图解析器配置
# server port
server.port=8081

# Spring thymeleaf
# 修改页面不需要重启服务器
spring.thymeleaf.cache=false
spring.thymeleaf.prefix=classpath:/templates/pages/
spring.thymeleaf.suffix=.html
3)写一个RestController接口
模拟业务操作
package com.gyd.springboothello.controller;
import org.springframework.stereotype.Controller;
import org.springframework.ui.Model;
import org.springframework.web.bind.annotation.RequestMapping;
import java.util.Arrays;
import java.util.List;
/*
*@Controller:如果当前类所在的包配置了Spring容器包扫描,具有
*该注解的类,就会作为bean注册到spring容器中,由spring容器创建实例。
*/
@Controller
@RequestMapping("/show/")
public class TestController {
/*
* @RequestMapping:为当前方法配置访问路径
* 如果Controllor类上没有配置访问路径,当前项目中所有controller中方法上的访问路径都不能冲突
*/
@RequestMapping("findAll")
public String findAll(Model model) {
List<String> lists = loadDbData();
model.addAttribute("list", lists);
return "main";
}
private List<String> loadDbData(){
//模拟查询db
return Arrays.asList("1","2","3");
}
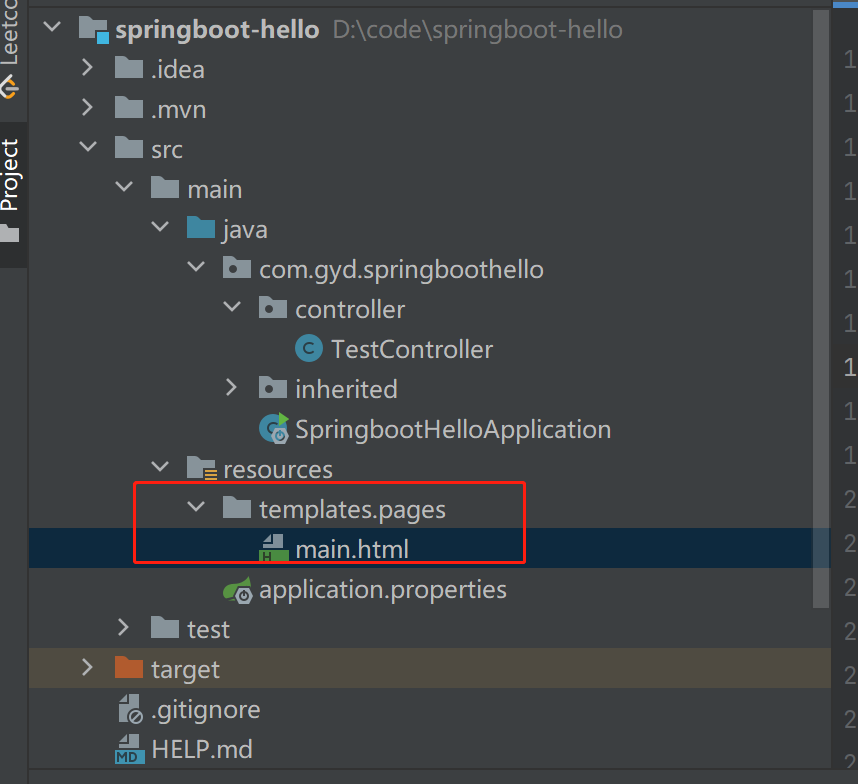
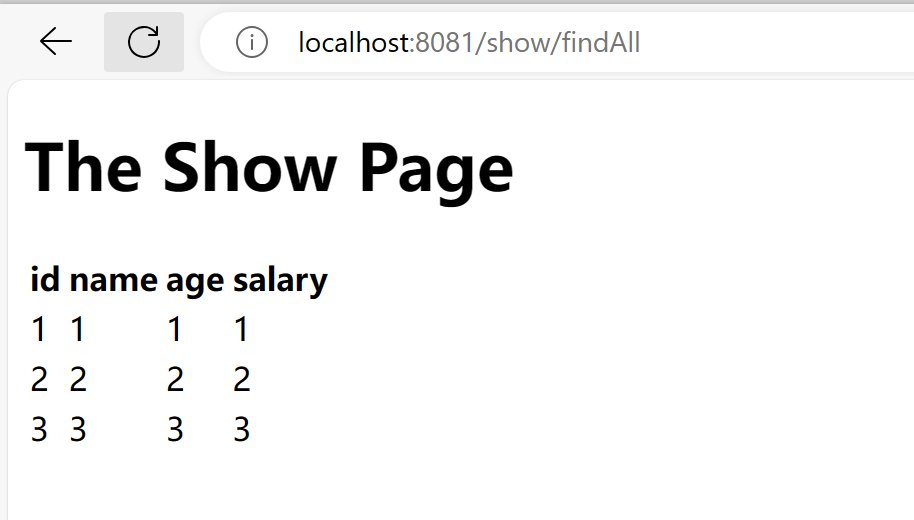
}4)创建html页面 在templates/pages目录下创建main.html,用于展示数据
若没有templates/pages 则新建一个目录
<!DOCTYPE html>
<html>
<head>
    <meta charset="UTF-8">
    <title>Insert title here</title>
</head>
<body>
<h1>The Show Page</h1>
<table>
    <thead>
    <tr>
        <th>id</th>
        <th>name</th>
        <th>age</th>
        <th>salary</th>
    </tr>
    </thead>
    <tbody>
    <tr th:each="l:${list}">
        <td th:text="${l}">1</td>
        <td th:text="${l}">Tom</td>
        <td th:text="${l}">18</td>
        <td th:text="${l}">5000.0</td>
    </tr>
    </tbody>
</table>
</body>
</html>
5)运行并访问页面
2、整合Junit
1)引入单元测试框架支持
<!-- 添加Junit依赖 -->
<dependency>
	<groupId>org.springframework.boot</groupId>
	<artifactId>spring-boot-starter-test</artifactId>
	<scope>test</scope>
</dependency>
2)创建一个service
@Service
public class TestService {
    public String query(){
        System.out.println("query()....");
		return "data";
    }
}
3)创建基于service的单元测试
/**
 * TestService的测试类
 */
@SpringBootTest
public class TestServiceDemo {

    @Autowired
    private TestService testService;

    @Test
    public void testAdd(){
        System.out.println(testService.query());
    }
}
4)运行单元测试,执行结果如下
query()....
data
3、整合JDBC访问数据库
SpringBoot 中默认自动配置有 HikariCP连接池(HikariCP连接池是目前最快的连接池)
这里以整合mysql为例
1)添加mysql驱动依赖
<!--mysql驱动-->
<dependency>
	<groupId>mysql</groupId>
	<artifactId>mysql-connector-java</artifactId>
	<scope>runtime</scope>
 </dependency>
2)配置数据库访问参数
在SpringBoot的 全局属性(application.properties文件) 添加参数
# 连接四大参数
spring.datasource.url=jdbc:mysql://127.0.0.1:6666/gyd?useUnicode=true&characterEncoding=utf8&useSSL=false&serverTimezone=Asia/Shanghai&allowPublicKeyRetrieval=true
spring.datasource.username=root
spring.datasource.password=1234
# 可省略,SpringBoot自动推断
#spring.datasource.driverClassName=com.mysql.jdbc.Driver
#spring.datasource.hikari.idle-timeout=60000
#spring.datasource.hikari.maximum-pool-size=30
#spring.datasource.hikari.minimum-idle=10
3)创建实体类User(指定库中的表列属性信息表)
表列名 和 类属性名 一致,在这一说法的前提它们支持 驼峰命名 和 下划线命名. 如: (库列名) user_name -> (类属性名)userName
public class User {

    private Integer id;
    private String name;
    private Integer age;

    public String getName() {
        return name;
    }

    public void setName(String name) {
        this.name = name;
    }

    public Integer getAge() {
        return age;
    }

    public void setAge(Integer age) {
        this.age = age;
    }

    public Integer getId() {
        return id;
    }

    public void setId(Integer id) {
        this.id = id;
    }

    @Override
    public String toString() {
        return "User{" +
                "id=" + id +
                ", name='" + name + '\'' +
                ", age=" + age +
                '}';
    }
}
4)创建jdbc操作类
package com.gyd.springboothello.dao;

import com.gyd.springboothello.entity.User;
import org.springframework.beans.factory.annotation.Autowired;
import org.springframework.jdbc.core.BeanPropertyRowMapper;
import org.springframework.jdbc.core.JdbcTemplate;
import org.springframework.jdbc.core.RowMapper;
import org.springframework.stereotype.Repository;
import org.springframework.transaction.annotation.Isolation;
import org.springframework.transaction.annotation.Propagation;
import org.springframework.transaction.annotation.Transactional;

import java.util.List;

@Repository
public class UserDao {
    @Autowired
    private JdbcTemplate jdbcTemplate;
    public List<User> findAll(Integer id) {
        System.out.println("UserDaoImpl findAll");
        RowMapper<User> rowMapper = new BeanPropertyRowMapper<>(User.class);
        //将id绑定到SQL语句中,并通过RowMapper返回list
        return jdbcTemplate.query("select id,name,age from user where id = ?", rowMapper,id);
    }


    @Transactional(propagation = Propagation.REQUIRED,isolation = Isolation.DEFAULT,readOnly = false)
    public void update(User user) {
        System.out.println("UserDaoImpl update");
        jdbcTemplate.update("update user set name= ?,age = ? where id = ?",user.getName(),user.getAge(),user.getId());
    }

    @Transactional(propagation = Propagation.REQUIRED,isolation = Isolation.DEFAULT,readOnly = false)
    public void insert(User user) {
        System.out.println("UserDaoImpl insert");
        jdbcTemplate.update("insert into user(id,name,age) values(?,?,?)",user.getId(),user.getName(),user.getAge());
    }
}
5)创建单元测试并执行
package com.gyd.springboothello;

import com.gyd.springboothello.dao.UserDao;
import org.junit.jupiter.api.Test;
import org.springframework.beans.factory.annotation.Autowired;
import org.springframework.boot.test.context.SpringBootTest;

@SpringBootTest
public class JDBCDaoTest {

    @Autowired
    private UserDao userDao;

    @Test
    public void testAdd(){
        System.out.println(userDao.findAll(1));
    }
}
4、整合Mybatis框架
1)引入mybatis依赖
<!--mybatis -->
<dependency>
    <groupId>org.mybatis.spring.boot</groupId>
    <artifactId>mybatis-spring-boot-starter</artifactId>
    <version>1.3.2</version>
</dependency>
2)在SpringBoot的 全局属性(application.properties文件) 添加参数
# mybatis 别名扫描
mybatis.type-aliases-package=com.gyd
# mapper.xml文件位置 (使用在有映射的前提)
mybatis.mapper-locations=classpath:mappers/*.xml
3)创建实体类User(指定库中的表列属性信息表)
前面整合JDBC部分有提过,直接复用
4)创建 UserMapper接口 ,全限定名 com.gyd.springboothello.mapper
public class UserMapper {
    public interface UserMapping {
        List<User> findAll();
    }
}
5)创建 UserMapper.xml映射文件
放在resources/mappers目录下,需要和第2步的扫描配置路径保持一致
<?xml version="1.0" encoding="UTF-8"?>
<!DOCTYPE mapper
        PUBLIC "-//mybatis.org//DTD Mapper 3.0//EN"
        "http://mybatis.org/dtd/mybatis-3-mapper.dtd">
<mapper namespace="com.gyd.springboothello.mapper">

    <select id="findAll" resultType="com.gyd.springboothello.entity.User">
        select * from user
    </select>

</mapper>
6)Mapper映射加载
加载方式有两种:
- 直接在UserMapper类上增加注解
@Mapper
public interface UserMapper {
    ....
}- 在 @SpringBootApplication注解下的启动类,添加@MapperScan注解 value参数为 扫描的包路径
package com.gyd.springboothello;

import org.mybatis.spring.annotation.MapperScan;
import org.springframework.boot.SpringApplication;
import org.springframework.boot.autoconfigure.SpringBootApplication;
import org.springframework.boot.autoconfigure.jdbc.DataSourceAutoConfiguration;

// 启动类
@SpringBootApplication(exclude = DataSourceAutoConfiguration.class)
@MapperScan("com.gyd.springboothello.mapper")
public class SpringbootHelloApplication {
	public static void main(String[] args) {
		SpringApplication.run(SpringbootHelloApplication.class, args);
	}
}
7)创建单元测试并执行
package com.gyd.springboothello;

import com.gyd.springboothello.dao.UserDao;
import org.junit.jupiter.api.Test;
import org.springframework.beans.factory.annotation.Autowired;
import org.springframework.boot.test.context.SpringBootTest;

@SpringBootTest
public class MybatisTest {

    @Autowired
    private UserMapper userMapper;

    @Test
    public void testAdd(){
        System.out.println(userMapper.findAll(1));
    }
}
5、整合WebSocket
WebSocket简介
WebSocket 是一种在单个TCP连接上进行全双工通信的协议。WebSocket 使得客户端和服务器之间的数据交换变得更加简单,允许服务端主动向客户端推送数据。
在 WebSocket API 中,浏览器和服务器只需要完成一次握手,两者之间就直接可以创建持久性的连接, 并进行双向数据传输。(维基百科)
WebSocket本质上一种计算机网络应用层的协议,用来弥补http协议在持久通信能力上的不足。
WebSocket 协议在2008年诞生,2011年成为国际标准。现在最新版本浏览器都已经支持了。
它的最大特点就是,服务器可以主动向客户端推送信息,客户端也可以主动向服务器发送信息,是真正的双向平等对话,属于服务器推送技术的一种。
WebSocket 的其他特点包括:
(1)建立在 TCP 协议之上,服务器端的实现比较容易。
(2)与 HTTP 协议有着良好的兼容性。默认端口也是80和443,并且握手阶段采用 HTTP 协议,因此握手时不容易屏蔽,能通过各种 HTTP 代理服务器。
(3)数据格式比较轻量,性能开销小,通信高效。
(4)可以发送文本,也可以发送二进制数据。
(5)没有同源限制,客户端可以与任意服务器通信。
(6)协议标识符是ws(如果加密,则为wss),服务器网址就是 URL。
WebSocket优缺点
1)优点:
- WebSocket协议一旦建议后,互相沟通所消耗的请求头是很小的
- 服务器可以向客户端推送消息了
2)缺点:
- 少部分浏览器不支持,浏览器支持的程度与方式有区别(IE10)
WebSocket使用场景
即时聊天通信
多玩家游戏
在线协同编辑/编辑
实时数据流的拉取与推送
体育/游戏实况
实时地图位置
即时
Web应用程序:即时Web应用程序使用一个Web套接字在客户端显示数据,这些数据由后端服务器连续发送。在WebSocket中,数据被连续推送/传输到已经打开的同一连接中,这就是为什么WebSocket更快并提高了应用程序性能的原因。 例如在交易网站或比特币交易中,这是最不稳定的事情,它用于显示价格波动,数据被后端服务器使用Web套接字通道连续推送到客户端。游戏应用程序:在游戏应用程序中,你可能会注意到,服务器会持续接收数据,而不会刷新用户界面。屏幕上的用户界面会自动刷新,而且不需要建立新的连接,因此在
WebSocket游戏应用程序中非常有帮助。聊天应用程序:聊天应用程序仅使用
WebSocket建立一次连接,便能在订阅户之间交换,发布和广播消息。它重复使用相同的WebSocket连接,用于发送和接收消息以及一对一的消息传输。
下面记录一下 SpringBoot程序是如何整合WebSocket能力的。
1)引入jar包
这里直接创建前后端不分离的web应用程序(实际生产中web前端和后端是分离的工程)
<!-- 添加Web依赖 -->
 <dependency>
     <groupId>org.springframework.boot</groupId>
     <artifactId>spring-boot-starter-web</artifactId>
 </dependency>
 <dependency>
     <groupId>org.springframework.boot</groupId>
     <artifactId>spring-boot-starter-thymeleaf</artifactId>
 </dependency>
 <!--websocket-->
 <dependency>
    <groupId>org.springframework.boot</groupId>
    <artifactId>spring-boot-starter-websocket</artifactId>
 </dependency>
2)配置页面信息
在application.properties中添加页面相关配置
server.port=8082
# Spring thymeleaf
spring.thymeleaf.cache=false
spring.thymeleaf.prefix=classpath:/templates/pages/
spring.thymeleaf.suffix=.html
3)配置websocket
@Configuration
public class WebSocketConfig {
    @Bean
    public ServerEndpointExporter serverEndpointExporter() {
        return new ServerEndpointExporter();
    }
}
package com.gyd.websocket;
import org.springframework.stereotype.Component;
import javax.websocket.OnClose;
import javax.websocket.OnMessage;
import javax.websocket.OnOpen;
import javax.websocket.Session;
import javax.websocket.server.ServerEndpoint;
import java.util.concurrent.CopyOnWriteArraySet;
@Component
@ServerEndpoint("/websocket")
public class WebSocketService {
private Session session;
//保存连接
private static CopyOnWriteArraySet<WebSocketService> webSocketService = new CopyOnWriteArraySet<>();
/**
* 建立连接
* @param session
*/
@OnOpen
public void opOpen(Session session) {
this.session = session;
webSocketService.add(this);
System.out.println("有新的连接=============》" + webSocketService.size());
}
/**
* 断开连接
*/
@OnClose
public void onClose() {
webSocketService.remove(this);
System.out.println("断开连接=============》" + webSocketService.size());
}
/**
* 接收客户端消息
* @param message
*/
@OnMessage
public void onMessage(String message) {
System.out.println("收到客户端消息" + message);
}
/**
* 发送消息到客户端
* @param message
*/
public void sendMessage(String message) {
for (WebSocketService webSocketService2 : webSocketService) {
System.out.println("广播消息" + message);
webSocketService2.session.getAsyncRemote().sendText(message);
}
}
}4)创建接口
页面访问接口:/show/topic (对应页面名称)
websocket数据模拟接口:/show/createOrder
package com.gyd.contoller;


import com.gyd.websocket.WebSocketService;
import org.springframework.beans.factory.annotation.Autowired;
import org.springframework.stereotype.Controller;
import org.springframework.web.bind.annotation.RequestMapping;
import org.springframework.web.bind.annotation.ResponseBody;

import java.util.UUID;


/*
 *@Controller:如果当前类所在的包配置了Spring容器包扫描,具有
 *该注解的类,就会作为bean注册到spring容器中,由spring容器创建实例。
 */
@Controller
@RequestMapping("/show/")
public class WebSocketTestController {

    @Autowired
    private WebSocketService webSocketService;

    /**
     * 跳转thymeleaf模板路径
     *
     * @return
     */
    @RequestMapping("/topic")
    public String websocket() {
        return "topic";
    }

    /**
     * 模拟创建订单,发送消息到客户端
     *
     * @return
     */
    @RequestMapping("/createOrder")
    public @ResponseBody String createOrder() {
        webSocketService.sendMessage("你有新的订单,请及时处理========>" + UUID.randomUUID());
        return "新增订单成功!";
    }
}
5)编写html页面
页面:topic.html
<!DOCTYPE html>
<html>
<head>
    <meta charset="UTF-8">
    <title>Insert title here</title>
</head>
<body>
<script type="text/javascript">
    var websocket=null
    if('WebSocket' in window){
        //调用service请求,获取信息
        topic=new WebSocket("ws://localhost:8082/websocket");
    }else{
        alert("该浏览器不支持WebSocket!")
    }

    topic.onopen=function(event){
        console.log("建立连接!");
    }


    topic.onclose=function(event){
        console.log("连接关闭!");
    }

    topic.onmessage=function(event){
        console.log("收到消息!"+event.data);
        document.getElementById("info").textContent +=event.data;
        //弹窗提醒
    }

    topic.onerror=function(){
        alert("websocket发生错误!");
    }

    topic.onbeforeunload=function(){
        topic.close();
    }
</script>
<h4>您好</h4>
    <span id="info"></span>
</body>
</html>
6)运行测试
先启动应用,然后在浏览器输入127.0.0.1:8082/show/topic 打开topic.html页面,然后调用127.0.0.1:8082/show/createOrder 模拟数据创建,看页面是否收到创建的数据:
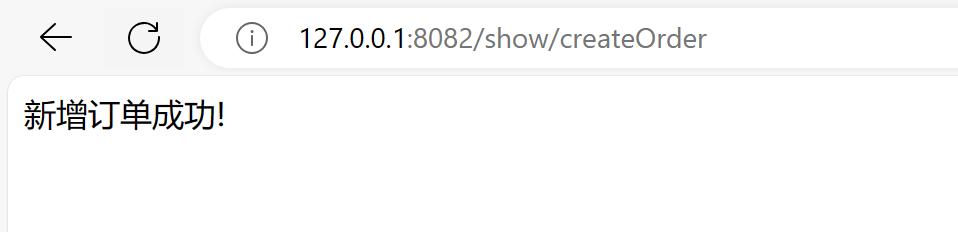
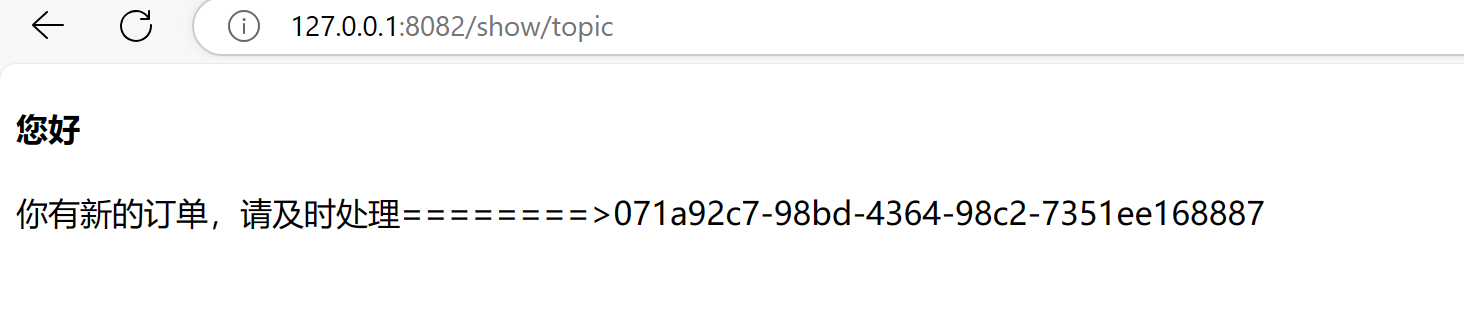
这样就实现了服务端推送数据到客户端的效果啦! websocket是全双工的,客户端也可以往服务端推送,两者之间只需要建立一次链接即可!
6、整合Redis
1)添加redis所需依赖
<dependency>
  <groupId>org.springframework.boot</groupId>
  <artifactId>spring-boot-starter-data-redis</artifactId>
</dependency>
这里我们直接引入了spring-boot-starter-data-redis这个springBoot本身就已经提供好了的starter, 我们可以点击去看一下这个starter中包含了哪些依赖:
  <dependencies>
    <dependency>
      <groupId>org.springframework.boot</groupId>
      <artifactId>spring-boot-starter</artifactId>
      <version>2.7.14</version>
      <scope>compile</scope>
    </dependency>
    <dependency>
      <groupId>org.springframework.data</groupId>
      <artifactId>spring-data-redis</artifactId>
      <version>2.7.14</version>
      <scope>compile</scope>
    </dependency>
    <dependency>
      <groupId>io.lettuce</groupId>
      <artifactId>lettuce-core</artifactId>
      <version>6.1.10.RELEASE</version>
      <scope>compile</scope>
    </dependency>
  </dependencies>
可以发现,里面包含了spring-data-redis和 lettuce-core两个核心包,这就是为什么说我们的spring-boot-starter-data-redis默认使用的就是lettuce这个客户端。
如果我们想要使用jedis客户端怎么办呢?只需要排除lettuce这个依赖,再引入jedis的相关依赖就可以了,这里得亏springboot强大的自动配置功能。
2)添加redis配置
# redis
spring.redis.host=localhost
spring.redis.port=6379
spring.redis.password=
spring.redis.database=0
如果是使用的集群模式部署redis,那么配置如下:
#spring.redis.cluster.nodes=10.255.144.115:7001,10.255.144.115:7002,10.255.144.115:7003
#spring.redis.cluster.max-redirects=3
如果我们想要给我们的redis客户端(lettuce)配置上连接池,可以增加如下配置:
spring.redis.lettuce.pool.max-idle=16
spring.redis.lettuce.pool.max-active=32
spring.redis.lettuce.pool.min-idle=8

#如果使用的是jedis,就把lettuce换成jedis(同时要注意依赖也是要换的)。
#spring.redis.jedis.pool.max-idle=16
#spring.redis.jedis.pool.max-active=32
#spring.redis.jedis.pool.min-idle=8
上面增加了连接池的配置,还需要引入一个连接池依赖,才会生效,pom依赖如下:
<dependency>
    <groupId>org.apache.commons</groupId>
    <artifactId>commons-pool2</artifactId>
</dependency>
3)使用redis进行读写
使用spring-data-redis中为我们提供的 RedisTemplate 这个类,就可以操作redis读写缓存了
package com.gyd.contoller;

import org.springframework.data.redis.core.RedisTemplate;
import org.springframework.web.bind.annotation.GetMapping;
import org.springframework.web.bind.annotation.RequestMapping;
import org.springframework.web.bind.annotation.RestController;

@RestController
@RequestMapping("/redis")
public class RedisController {

    private final RedisTemplate redisTemplate;

    public RedisController(RedisTemplate redisTemplate) {
        this.redisTemplate = redisTemplate;
    }

    @GetMapping("/save")
    public String save(String key, String value){
        redisTemplate.opsForValue().set(key, value);
        return "success";
    }

    @GetMapping("/get")
    public String get(String key){
        Object value = redisTemplate.opsForValue().get(key);
        return null != value ? (String) value :null;
    }
}
上面代码简单演示了使用set和get命令和redis服务端进行交互,实际业务中可能涉及到其它的命令,一般是将RedisTemplate封装为工具类,然后提供给业务类进行调用。
7、整合Kafka
默认已经部署好了Kafka环境,关于环境部署可以参考Kafka基本概念入门
1)添加kafka所需依赖
<dependency>
    <groupId>org.springframework.kafka</groupId>
    <artifactId>spring-kafka</artifactId>
</dependency>
<dependency>
    <groupId>org.apache.kafka</groupId>
    <artifactId>kafka-clients</artifactId>
</dependency>
2)新增配置项
# kafka
spring.kafka.bootstrap-servers=localhost:9092
spring.kafka.consumer.group-id=my-group
spring.kafka.consumer.auto-offset-reset=earliest
spring.kafka.producer.value-serializer=org.apache.kafka.common.serialization.StringSerializer
spring.kafka.producer.key-serializer=org.apache.kafka.common.serialization.StringSerializer
3)创建生产者
首先,我们将创建一个 KafkaProducerConfig 类,用于配置 Kafka 生产者:
package com.gyd.config;

import org.apache.kafka.clients.producer.ProducerConfig;
import org.apache.kafka.common.serialization.StringSerializer;
import org.springframework.beans.factory.annotation.Value;
import org.springframework.context.annotation.Bean;
import org.springframework.context.annotation.Configuration;
import org.springframework.kafka.core.DefaultKafkaProducerFactory;
import org.springframework.kafka.core.KafkaTemplate;
import org.springframework.kafka.core.ProducerFactory;

import java.util.HashMap;
import java.util.Map;

/**
 * @ClassName KafkaProducerConfig
 * @Description kafka生产者配置
 * @Author guoyading
 * @Date 2023/10/26 14:34
 * @Version 1.0
 */
@Configuration
public class KafkaProducerConfig {

    @Value("${spring.kafka.bootstrap-servers}")
    private String bootstrapServers;

    @Bean
    public Map<String, Object> producerConfigs() {
        Map<String, Object> props = new HashMap<>();
        props.put(ProducerConfig.BOOTSTRAP_SERVERS_CONFIG, bootstrapServers);
        props.put(ProducerConfig.KEY_SERIALIZER_CLASS_CONFIG, StringSerializer.class);
        props.put(ProducerConfig.VALUE_SERIALIZER_CLASS_CONFIG, StringSerializer.class);
        return props;
    }

    @Bean
    public ProducerFactory<String, String> producerFactory() {
        return new DefaultKafkaProducerFactory<>(producerConfigs());
    }

    @Bean
    public KafkaTemplate<String, String> kafkaTemplate() {
        return new KafkaTemplate<>(producerFactory());
    }

}
然后,我们使用 kafkaTemplate.send 方法发送消息到 my-topic 主题。
package com.gyd.contoller;
import org.springframework.beans.factory.annotation.Autowired;
import org.springframework.kafka.core.KafkaTemplate;
import org.springframework.web.bind.annotation.PostMapping;
import org.springframework.web.bind.annotation.RequestBody;
import org.springframework.web.bind.annotation.RestController;
/**
* @ClassName KafkaController
* @Description 生产消息测试接口
* @Author guoyading
* @Date 2023/10/26 14:35
* @Version 1.0
*/
@RestController
public class KafkaController {
@Autowired
private KafkaTemplate<String, String> kafkaTemplate;
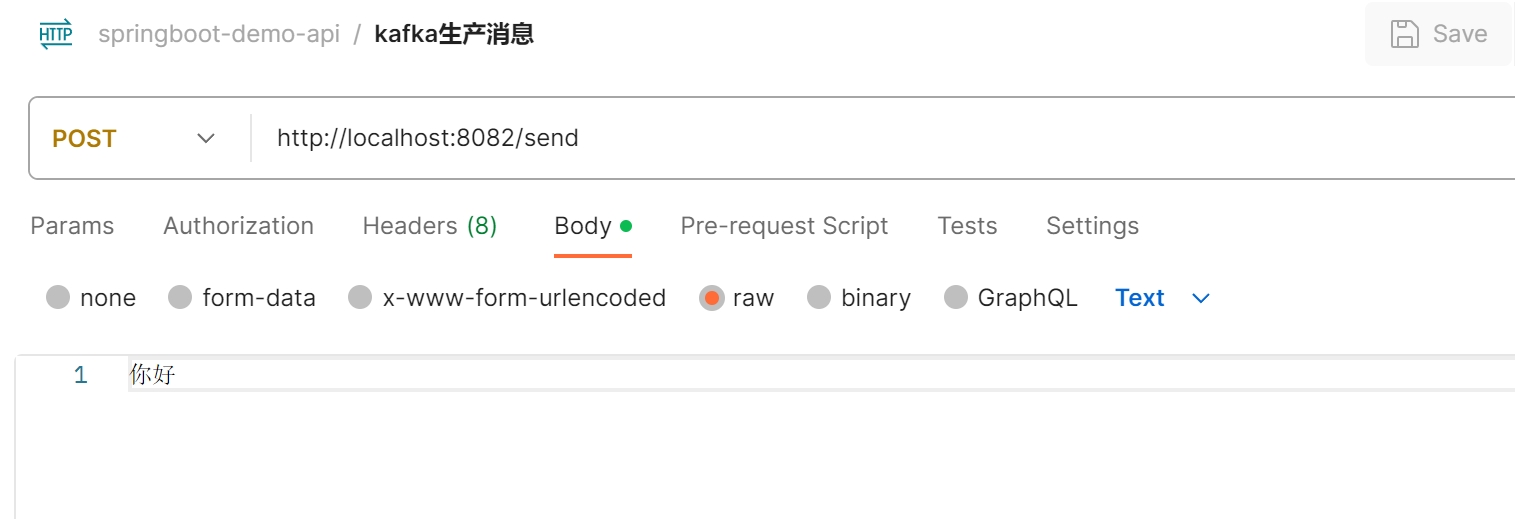
@PostMapping("/send")
public void sendMessage(@RequestBody String message) {
kafkaTemplate.send("my-topic", message);
}
}4)创建消费者
首先,我们将创建一个 KafkaConsumerConfig 类,用于配置 Kafka 消费者:
package com.gyd.config;

import org.apache.kafka.clients.consumer.ConsumerConfig;
import org.apache.kafka.common.serialization.StringDeserializer;
import org.springframework.beans.factory.annotation.Value;
import org.springframework.context.annotation.Bean;
import org.springframework.context.annotation.Configuration;
import org.springframework.kafka.annotation.EnableKafka;
import org.springframework.kafka.config.ConcurrentKafkaListenerContainerFactory;
import org.springframework.kafka.core.ConsumerFactory;
import org.springframework.kafka.core.DefaultKafkaConsumerFactory;

import java.util.HashMap;
import java.util.Map;

/**
 * @ClassName KafkaConsumerConfig
 * @Description kafka消费者配置
 * @Author guoyading
 * @Date 2023/10/26 14:36
 * @Version 1.0
 */
@Configuration
@EnableKafka
public class KafkaConsumerConfig {

    @Value("${spring.kafka.bootstrap-servers}")
    private String bootstrapServers;

    @Value("${spring.kafka.consumer.group-id}")
    private String groupId;

    @Bean
    public Map<String, Object> consumerConfigs() {
        Map<String, Object> props = new HashMap<>();
        props.put(ConsumerConfig.BOOTSTRAP_SERVERS_CONFIG, bootstrapServers);
        props.put(ConsumerConfig.GROUP_ID_CONFIG, groupId);
        props.put(ConsumerConfig.AUTO_OFFSET_RESET_CONFIG, "earliest");
        props.put(ConsumerConfig.KEY_DESERIALIZER_CLASS_CONFIG, StringDeserializer.class);
        props.put(ConsumerConfig.VALUE_DESERIALIZER_CLASS_CONFIG, StringDeserializer.class);
        return props;
    }

    @Bean
    public ConsumerFactory<String, String> consumerFactory() {
        return new DefaultKafkaConsumerFactory<>(consumerConfigs());
    }

    @Bean
    public ConcurrentKafkaListenerContainerFactory<String, String> kafkaListenerContainerFactory() {
        ConcurrentKafkaListenerContainerFactory<String, String> factory = new ConcurrentKafkaListenerContainerFactory<>();
        factory.setConsumerFactory(consumerFactory());
        return factory;
    }
}
然后,我们将创建一个 Kafka 消费者类 KafkaConsumer,用于监听 my-topic 主题并接收消息:
package com.gyd.listener;

import org.springframework.kafka.annotation.KafkaListener;
import org.springframework.stereotype.Service;

/**
 * @ClassName KafkaConsumer
 * @Description kafka消费者
 * @Author guoyading
 * @Date 2023/10/26 14:37
 * @Version 1.0
 */
@Service
public class KafkaConsumer {

    @KafkaListener(topics = "my-topic", groupId = "my-group-id")
    public void consume(String message) {
        System.out.println("Received message: " + message);
    }
}
5)验证
请求http://localhost:8082/send, 生产一个消息。
查看控制台,消费者消费到了对应的消息:

一个简单的kafka接入demo就完成了。
八、基础知识-打包、部署和运行
Spring Boot使用了内嵌容器,因此它的部署方式也变得非常简单灵活,一方面可以将Spring Boot项目打包成独立的jar或者war包来运行,也可以单独打包成war包部署到Tomcat容器中运行。
1、如何打包
1)生成jar包
现在Maven、Gradle已经成了我们日常开发必不可少的构建工具,使用这些工具很容易地将项目打包成jar或者war包。下面就以Maven项目为例演示Spring Boot项目如何打包发布。
Maven默认会将项目打成jar包,也可以在pom.xml文件中指定打包方式。pom文件配置示例如下:
<groupId>com.gyd</groupId>
<artifactId>springboot-hello</artifactId>
<version>0.0.1-SNAPSHOT</version>
<name>springboot-hello</name>
<description>springboot的第一个程序</description>
<!--指定打包方式-->
<packaging>jar</packaging>
Spring Boot还自带一个spring-boot-maven-plugin插件用来打包,我们只需要再在pom.xml中加入以下配置:
<project ...>
  ...
  <build>
      <plugins>
          <plugin>
              <groupId>org.springframework.boot</groupId>
              <artifactId>spring-boot-maven-plugin</artifactId>
          </plugin>
      </plugins>
  </build>
</project>
无需任何配置,Spring Boot的这款插件会自动定位应用程序的入口Class,我们执行以下Maven命令即可打包:
//可以加一些可选参数 如 mvn clean package -Dmaven.test.skip=true 代表打包时排除测试代码的执行
//mvn clean package其实是两条命令: mvn clean是清除项目target目录下的文件,mvn package打包命令。两个命令可以一起执行。
mvn clean package
命令执行完成后,jar包会生成到target目录下,命名一般是“项目名+版本号.jar”的形式。如下图所示。
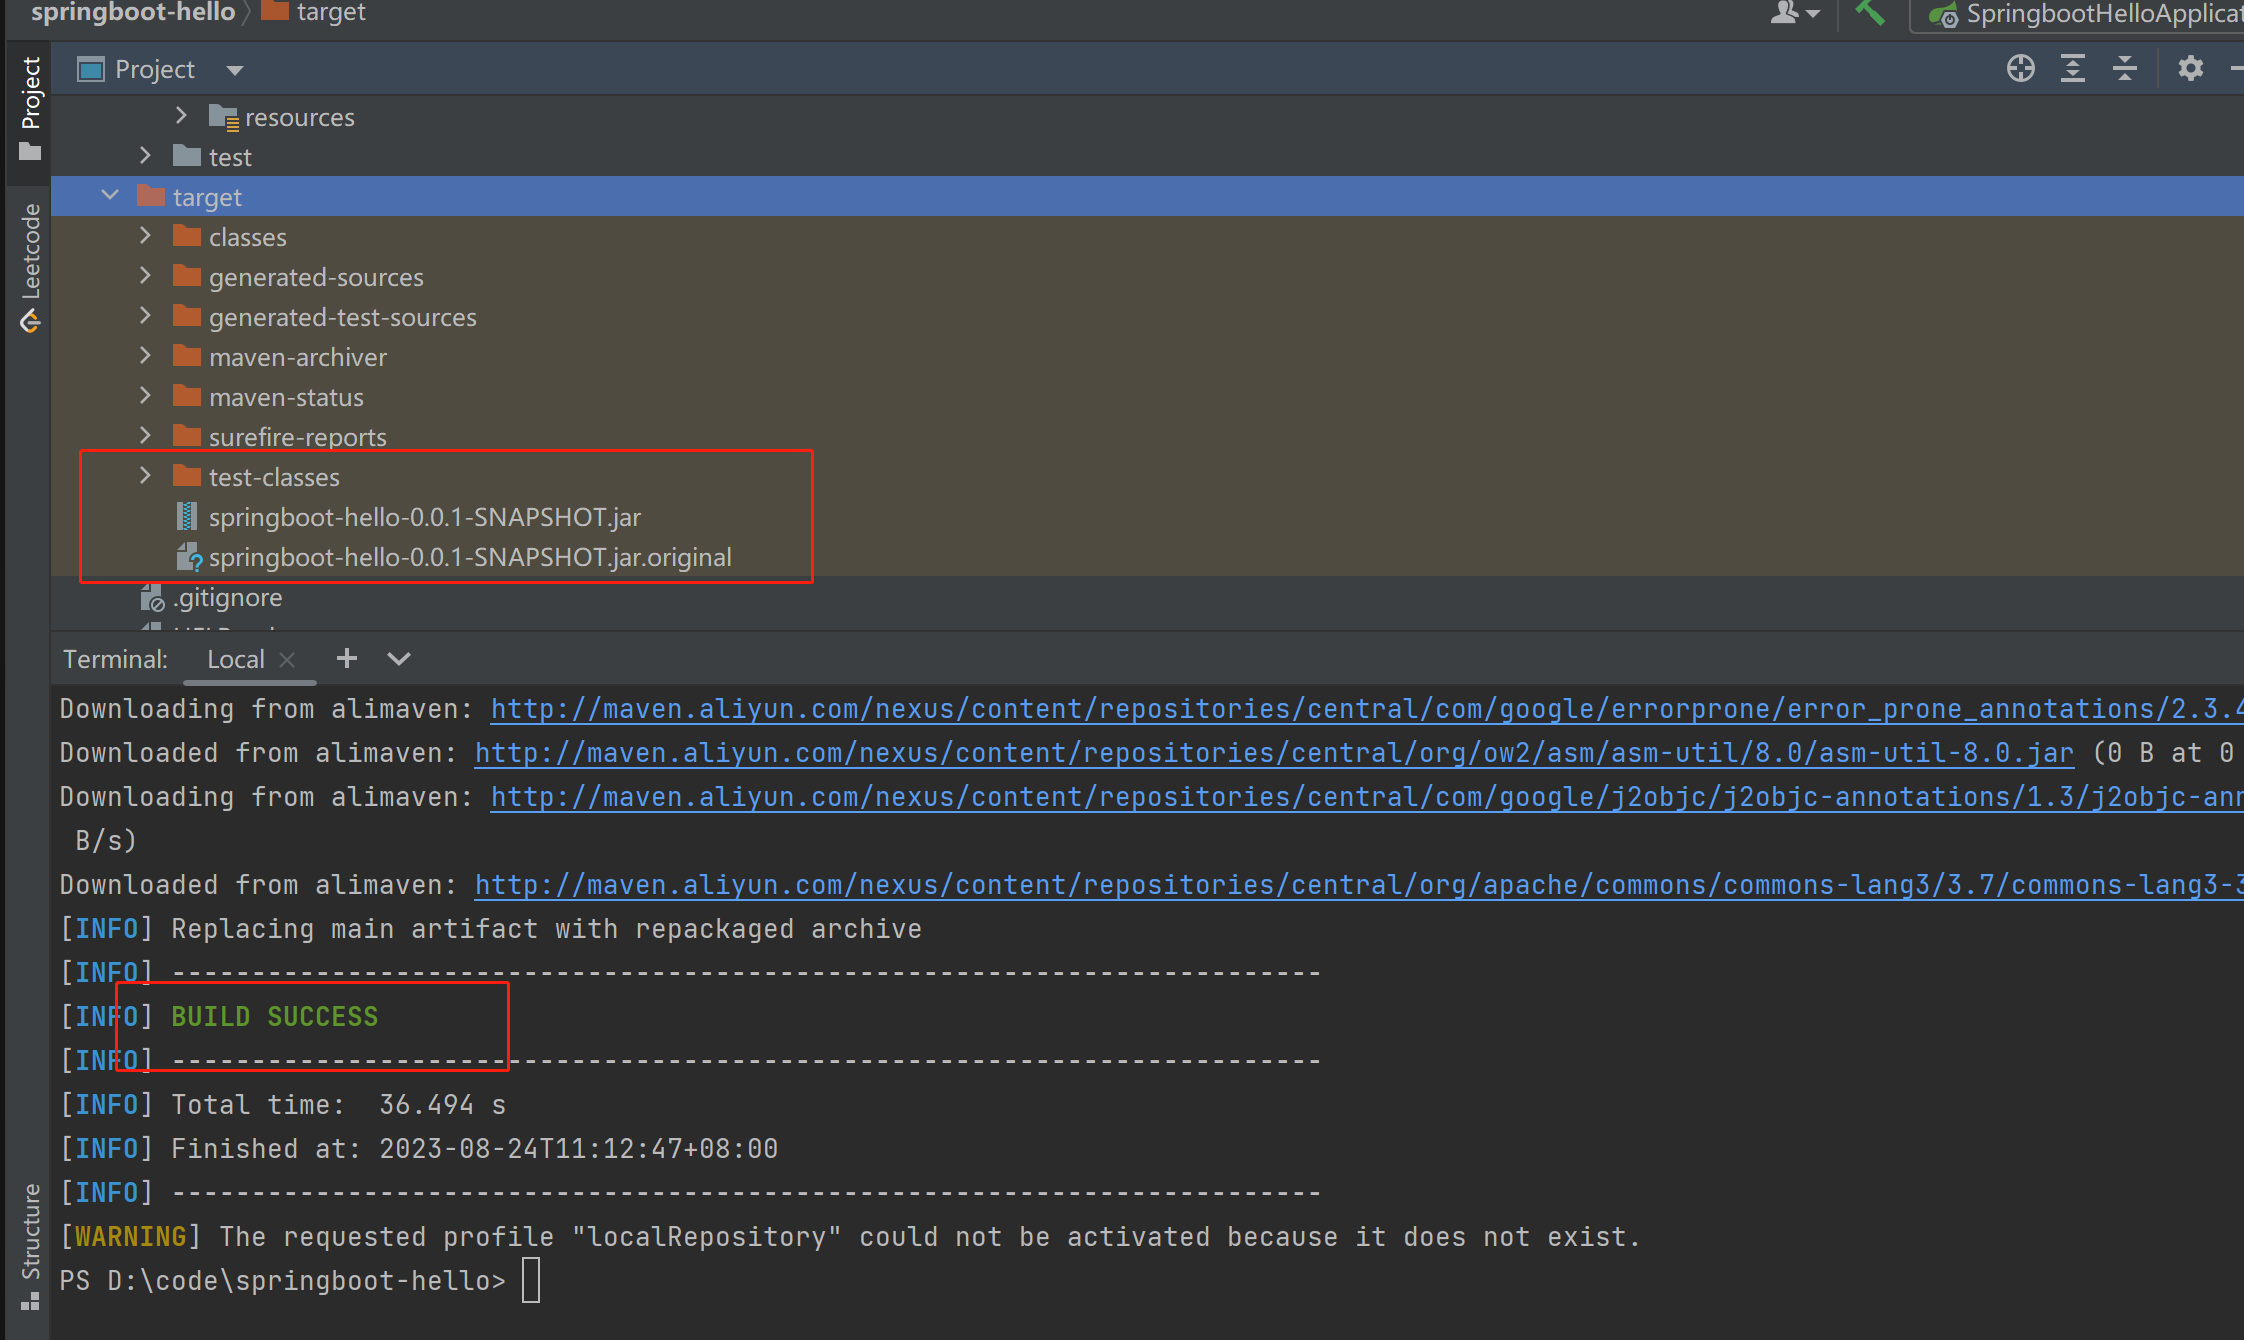
由于我们生成springboot程序时指定了如下依赖
<dependency>
  <groupId>org.springframework.boot</groupId>
  <artifactId>spring-boot-starter-data-jdbc</artifactId>
</dependency>
打包时默认会执行测试用例,而测试用例会启动springboot程序,springboot的自动配置功能默认会在启动时去加载数据源,由于我们没有配置数据源,数据源获取失败,异常报错,启动失败。
可以在启动类上排除这个数据源的加载:
@SpringBootApplication(exclude = DataSourceAutoConfiguration.class)
public class SpringbootHelloApplication {
	public static void main(String[] args) {
		SpringApplication.run(SpringbootHelloApplication.class, args);
	}

}
再次执行mvn clean package 正常完成打包
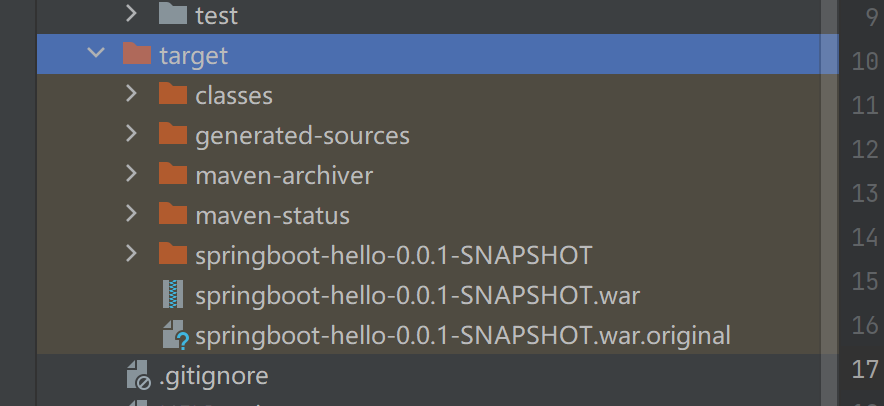
2)生成war包
Spring Boot项目既可以生成war发布,也可以生成jar包发布 前面介绍了maven打包,指定的是jar包格式的产物,那war包和jar包有什么区别呢?
jar包 通过内置tomcat运行,不需要额外安装tomcat。如需修改内置tomcat的配置,只需要在spring boot的配置文件中配置。内置tomcat没有自己的日志输出,全靠jar包应用输出日志。但是部署简单方便,适合快速部署。
war包 传统的应用交付方式,需要安装tomcat,然后将war包放到waeapps目录下运行,这样可以灵活选择tomcat版本,也可以直接修改tomcat的配置,同时有自己的tomcat日志输出,可以灵活配置安全策略。相对jar包来说没那么快速方便。
Spring Boot生成war包的方式和生成jar包的方式基本一样。只需要添加一些额外的配置,下面演示生成war包的方式:
- a. 修改项目中的pom.xml文件
将改为。示例代码如下:
<!--指定打包方式-->
<packaging>war</packaging>- b. 排除内嵌的tomcat 部署war包在Tomcat中运行,并不需要Spring Boot自带的Tomcat组件,所以需要在pom.xml文件中排除自带的Tomcat。示例代码如下
<dependency>
	<groupId>org.springframework.boot</groupId>
	<artifactId>spring-boot-starter-web</artifactId>
</dependency>
<!--将Tomcat组件的scope属性设置为provided,这样在打包产生的war中就不会包含Tomcat相关的jar-->
<dependency>
	<groupId>org.springframework.boot</groupId>
	<artifactId>spring-boot-starter-tomcat</artifactId>
	<scope>provided</scope>
</dependency>- c. 注册启动类 在项目的启动类中继承 SpringBootServletInitializer并重写configure( )方法:
package com.gyd.springboothello;

import org.mybatis.spring.annotation.MapperScan;
import org.springframework.boot.SpringApplication;
import org.springframework.boot.autoconfigure.SpringBootApplication;
import org.springframework.boot.autoconfigure.jdbc.DataSourceAutoConfiguration;
import org.springframework.boot.builder.SpringApplicationBuilder;
import org.springframework.boot.web.servlet.support.SpringBootServletInitializer;

@SpringBootApplication(exclude = DataSourceAutoConfiguration.class)
@MapperScan("com.gyd.springboothello.mapper")
public class SpringbootHelloApplication extends SpringBootServletInitializer {
	public static void main(String[] args) {
		SpringApplication.run(SpringbootHelloApplication.class, args);
	}

	@Override

	protected SpringApplicationBuilder configure(SpringApplicationBuilder application) {
		return application.sources(SpringbootHelloApplication.class);
	}

}- d. 执行打包命令生成war包
命令和打包jar的命令是一模一样的
命令执行完成后,会在target目录下生成:项目名+版本号.war文件,将打包好的war包复制到Tomcat服务器中webapps目录下启动即可。
2、部署
Spring Boot内嵌的内置Tomcat、Jetty等容器对项目部署带来了更多的改变,在服务器上仅仅需要几条命令即可部署项目。一般开发环境直接java -jar命令启动,正式环境需要将程序部署成服务。下面开始演示Spring Boot项目是如何运行、部署的。
1) 启动运行
简单点就是直接启动jar包。启动jar包命令如下:
java -jar springboot-hello-0.0.1-SNAPSHOT.jar这种方式是前台运行的,只要将控制台关闭,服务就会停止。实际生产中我们肯定不会前台运行,一般使用后台运行的方式来启动。
nohup java -jar springboot-hello-0.0.1-SNAPSHOT.jar上面的示例中,使用nohup java –jar xxx.jar &命令让程序以后台运行的方式执行。日志会被重定向到nohup.out文件中。也可以用“>filename 2>&1”来更改缺省的重定向文件名。命令如下:
nohup java -jar springboot-hello-0.0.1-SNAPSHOT.jar >spring.log 2>&1 &上面的示例中,使用“>spring.log 2>&1”参数将系统的运行日志保存到spring.log中。
以上就是简单的启动jar包的方式,使用简单。
Spring Boot支持在启动时添加定制,比如设置应用的堆内存、垃圾回收机制、日志路径等。具体有兴趣可以自行查查资料 哈哈哈!
2) 生产环节部署
前面介绍的运行方式比较简单,仅适合在开发测试环节使用,实际生产环境中考虑到后期的运维,建议大家使用脚本的方式来部署。
详情可参考:linux部署脚本
九、基础知识-监控和告警
1、Spring Boot Actuator
Spring Boot Actuator可以帮助我们监控和管理Spring Boot应用,比如健康检查、审计、统计和HTTP追踪等。所有的这些特性可以通过JMX或者HTTP endpoints来获得。
下面以前面的项目为例,总结一下如何快速接入actuator能力。
1)添加依赖
<dependency>
    <groupId>org.springframework.boot</groupId>
    <artifactId>spring-boot-starter-actuator</artifactId>
</dependency>
2)使用Actuator Endpoints来监控应用 Actuator创建了所谓的endpoint来暴露HTTP或者JMX来监控和管理应用。
例如下面的endpoint:
- /health 提供了关于应用健康的基础信息
- /metricsendpoints 展示了几个有用的度量信息,比如JVM内存使用情况、系统CPU使用情况、打开的文件等等
- /loggers 展示了应用的日志和可以让你在运行时改变日志等级
Actuator提供了非常多的endpoint,所有的endpoint都可以通过配置显示的开启和关闭,满足了我们基本的生产应用功能,官方介绍在这里:Actuator详解
3)启动应用,访问http://localhost:8080/actuator/health,则会显示如下内容:
{"status":"UP"}状态将是UP只要应用是健康的。如果应用不健康将会显示DOWN,比如与仪表盘的连接异常或者缺水磁盘空间等.
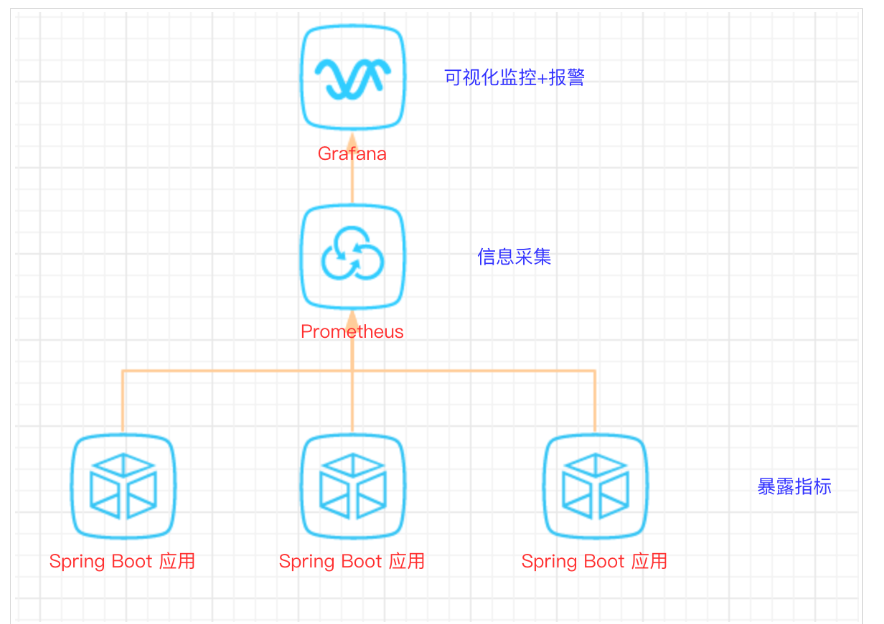
Actuator同时还可以与外部应用监控系统整合,比如 Prometheus, Graphite, DataDog, Influx, Wavefront, New Relic等。这些系统提供了非常好的仪表盘、图标、分析和告警等功能,使得我们可以通过统一的接口轻松的监控和管理应用。
SpringBoot的应用监控组合方案比较多,以小郭的工作经验来看,SpringBoot+Prometheus+Grafana是目前比较常用的方案之一。它们三者之间的关系大概如下图:
一般在公司有专门的运维人员来维护这些监控系统,有兴趣的小伙伴们也可以自行在本地研究搭建一下哦!
十、基础知识-黑科技
1、热部署
Spring Boot提供了一个开发者工具,可以监控classpath路径上的文件。只要源码或配置文件发生修改,可以实现不重启服务器情况下,对项目进行即时编译。引入热部署插件的步骤如下。
要使用这一开发者功能,我们只需添加如下依赖到pom.xml:
<dependency>
  <groupId>org.springframework.boot</groupId>
  <artifactId>spring-boot-devtools</artifactId>
</dependency>
在开发阶段,这个功能比较有用。
直接启动应用程序,然后试着修改源码,保存,观察日志输出,Spring Boot会自动重新加载。
默认配置下,针对/static、/public和/templates目录中的文件修改,不会自动重启。
总结
本文总结了SpringBoot框架的常见基础知识,例如自动配置原理、外部框架整合、打包部署运行、监控和告警等。许多知识点只是总结了入门级别的使用方式,希望借此篇总结为开始,后续持续丰富自己对SpringBoot框架的理解。
同时也希望此篇文章能够帮助到新手小伙伴们!
如果对您有帮助,动动小手指,点个关注啦!
参考资料
站在前人的基础上总结知识,为我所用! https://www.jianshu.com/p/d5943e303a1f https://www.cnblogs.com/2YSP/p/12827487.html https://www.jianshu.com/p/7f54e7250be3 https://juejin.cn/post/7064175611341717517?from=search-suggest https://blog.csdn.net/qq_40837310/article/details/106504778 https://blog.csdn.net/weixin_51539416/article/details/121360357 https://cloud.tencent.com/developer/article/1863671